
Apple Watch Serial My Notification
Table of Contents
Last week was my daughter birthday. I had a happy time with my family and now, focus to work
Abstract
Today, we will create a notification screen and learn how to use the Core Data framework with SwiftUI to store data. In this post, we will explore:
-
Working on
SwiftUI. -
How Core Data and
SwiftUIwork together -
Creating and updating Core Data objects
-
How to update views when stored data gets updated
-
Using SwiftUI property wrappers for fetching Core Data objects
UI design
First one, we will create a simple notification screen that users can see the latest notices. The finished screen look like:
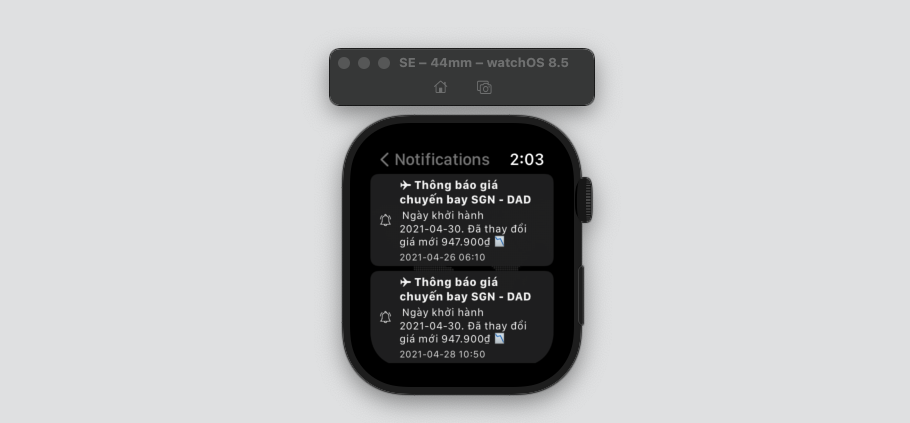
Notification Design
Related knowledge
What is Core Data?
Core Data is a graph-based optionally persisted model framework. Core Data can take care of your model layer, it can hold your entities, so you can ask Core Data for sorted, or filtered sets of entities that you need in some point of your app execution.
Core Data can store your data in a SQLite database, or it can have your data in-memory, or even synchronized with CloudKit.
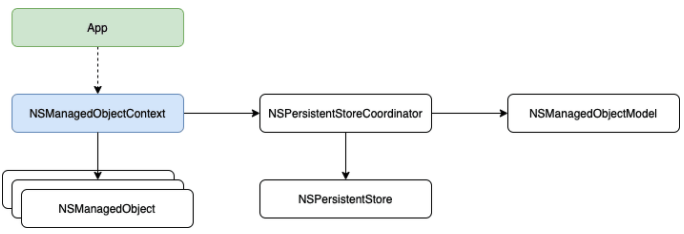
The Stack (source dev.to)
The Stack
The Core Data Stack is composed of objects which interact between them to persist entities. The main components of the Core Data Stack are:
-
NSManagedObjectModel: This class represents the descriptions for the entities you’ll persist in your apps. Most of times, you’ll define those entities using the Xcode visual editor, which will create a file with extension.xcdatamodeld. -
NSPersistentStoreCoordinator: The persistent store coordinator will interface with the actualPersistent Stores, such as the SQLite databases. This is the class that interface between your app and the actual persistent stores. It needs aNSManagedObjectModelto work. -
NSManagedObjectContext: The most important class in your Core Data Stack. Or, at least, the class you’ll interact the most during your app development. It works as a scratchpad where you can make modifications to yourNSManagedObjectentities and then save the context to reflect the changes in the persistent stores. It needs aNSPersistentStoreCoordinatorto work.
Versioning and Migration
Core Data helps you with versioning your data model and migration of user data with the evolution of the app.
Background Data Tasks
CoreData performs UI-Blocking data tasks, like parsing JSON into objects, but in the background, which further can be cached or stored to reduce server roundtrips.
How these components work together?
You can go to Core Data Explained to view for detail. The flow diagram below to understand the Core Data stack.
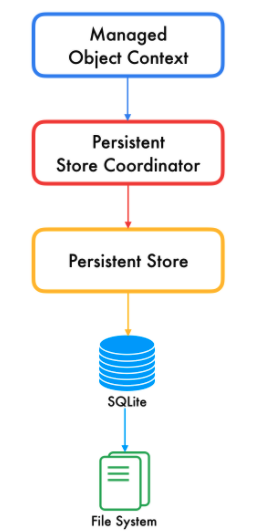
The work flow (posaninagendra.github.io)
Let’s Code
Notification Screen
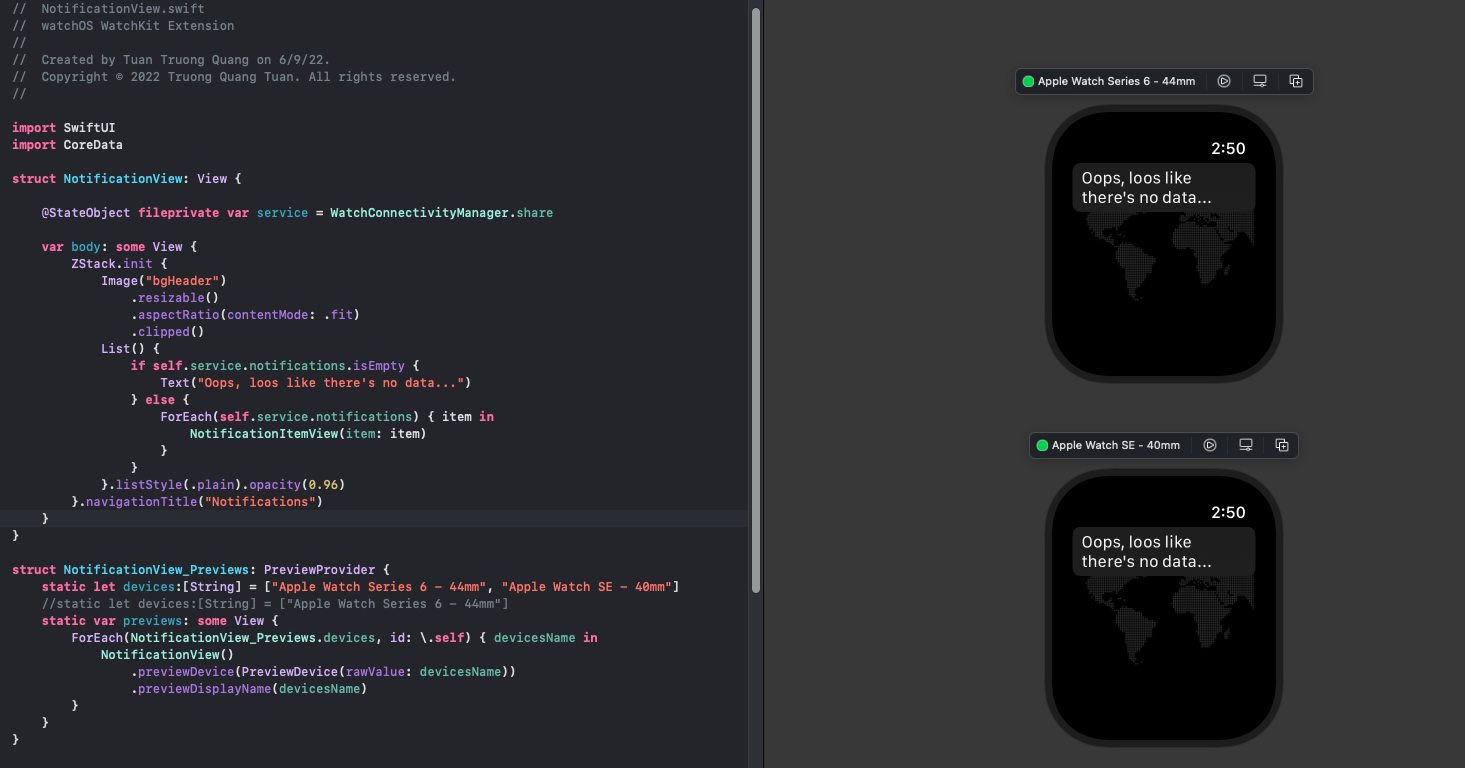
Here is the full code of NotificationView struct. It includes a sub view NotificationItemView
import SwiftUI
import CoreData

struct NotificationView: View {

    @StateObject fileprivate var service = WatchConnectivityManager.share

    var body: some View {
        ZStack.init {
            Image("bgHeader")
                .resizable()
                .aspectRatio(contentMode: .fit)
                .clipped()
            List() {
                if self.service.notifications.isEmpty {
                    Text("Oops, loos like there's no data...")
                } else {
                    ForEach(self.service.notifications) { item in
                        NotificationItemView(item: item)
                    }
                }
            }.listStyle(.plain).opacity(0.96)
        }.navigationTitle("Notifications")
    }
}
struct NotificationItemView: View {
    var item:NotificationItemModel
    var body: some View {
        HStack(alignment: .center, spacing: 8.0) {
            Image("notification")
                .resizable().frame(width: 12.0, height: 12.0, alignment: .center)
            VStack(alignment: .leading, spacing: 2.0) {
                Text(self.item.title).bold().font(.system(size: 12.0))
                Text(self.item.des).font(.system(size: 11.0))
                Text(self.item.date).font(.system(size: 10.0)).padding(.top, 1.0).opacity(0.9)
            }
        }
    }
}
NotificationView Previews
Load and Store
Preparing Core Data
Right-click on your project’s folder in the project navigator and then New File… In the new window, type “data” in the top right corner, select Data Model, and press Next. Give it a name, and save it.
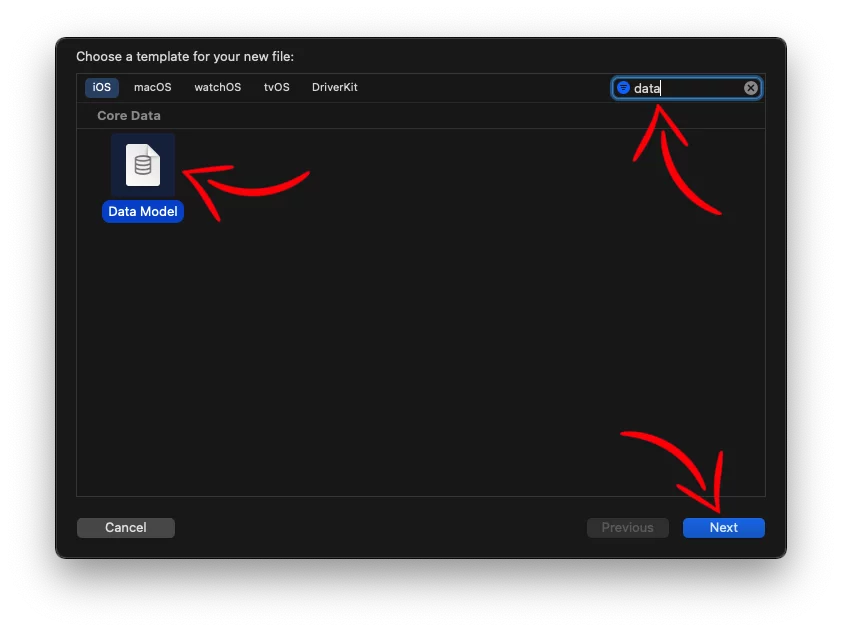
source: johncodeos.com (posaninagendra.github.io)
Now, we are going to create the structure for the data that we want to save with Core Data.
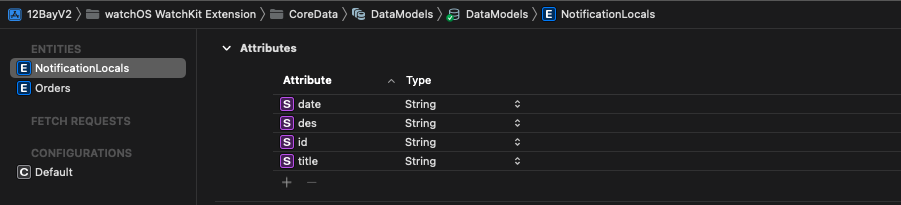
DataModels.xcdatamodeld
Core Data stack
After initializing the Core Data stack, it can be injected into SwiftUI views.
import SwiftUI

@main
struct _2BayV2App: App {
    @SceneBuilder var body: some Scene {
        let persistenceController = DataManager.shared
        WindowGroup {
            NavigationView {
                HomeView()
                    .environment(\.managedObjectContext, persistenceController.container.viewContext)
            }
        }

        WKNotificationScene(controller: NotificationController.self, category: "myCategory")
    }
}
As we can see above, the managed object context is injected into the HomeView by using the environment() modifier. After this is done, HomeView now has access to the managed object context to save, update or delete items.
Store and load local data
In this case, when we receive data from the iPhone we will store this data to locally and when users open an app we will load this. To do this, we need to create a singleton class to manage ObjectContext.
//
//  DataManager.swift
//  watchOS WatchKit Extension
//
//  Created by Tuan Truong Quang on 6/10/22.
//  Copyright © 2022 Truong Quang Tuan. All rights reserved.
//

import Foundation
import CoreData

class DataManager: ObservableObject {

    // Storage for Core Data
    let container: NSPersistentContainer = NSPersistentContainer(name: "DataModels")

    // A singleton for our entire app to use
    static let shared = DataManager()
    private init() {
        self.container.loadPersistentStores { persistentStore, error in
            XPrint("::DataManager container.loadPersistentStores: \(persistentStore)")
            XPrint("::DataManager container.loadPersistentStores error: \(error?.localizedDescription ?? "")")
            if error != nil {
                if let _url = persistentStore.url {
                    try? self.container.viewContext.persistentStoreCoordinator?.destroyPersistentStore(at: _url, ofType: NSSQLiteStoreType)
                    XPrint("::DataManager reset")
                    //create oneagain
                    self.container.loadPersistentStores { _, _ in }
                }
            }
        }
    }

    func save() {
        let context = self.container.viewContext

        if context.hasChanges {
            do {
                try context.save()
                XPrint("::DataManager save() success!")
            } catch {
                // Show some error here
                XPrint("::DataManager save() error!")
            }
        }
    }
}
func save() {} : Attempts to commit unsaved changes to registered objects to the context’s parent store.
hasChanges property) before invoking the save: method. Otherwise, Core Data may perform unnecessary work.
And now, we will add code to an extension to store and load notification data:
//MARK:// Notification
extension DataManager {
    func onSaveNotifications(withItems items:[NotificationItemModel]) {

        //delete all data
        let notiEntity = NSFetchRequest<NSFetchRequestResult>(entityName: "NotificationLocals")
        let delRequest = NSBatchDeleteRequest(fetchRequest: notiEntity)
        do {
            try self.container.viewContext.execute(delRequest)
            try self.container.viewContext.save()
            print ("::DataManager onSaveNotifications delete all success!")
        } catch let error {
            print ("::DataManager onSaveNotifications delete all data error: \(error.localizedDescription)")
        }

        items.forEach { item in
            let newLotiLocal = NSEntityDescription.insertNewObject(forEntityName: "NotificationLocals", into: self.container.viewContext)
            newLotiLocal.setValue(item.notiId, forKey: "id")
            newLotiLocal.setValue(item.title, forKey: "title")
            newLotiLocal.setValue(item.des, forKey: "des")
            newLotiLocal.setValue(item.date, forKey: "date")

        }
        self.save()
    }

    func onLoadAndCatchonAppForNotification() {
        let fetchRequest: NSFetchRequest<NotificationLocals> = NotificationLocals.fetchRequest()
        do {

            let objects = try self.container.viewContext.fetch(fetchRequest)

            let itemByLocal =  objects.map { (i_lc) -> NotificationItemModel in
                var item:NotificationItemModel = NotificationItemModel()
                item.notiId = i_lc.id ?? ""
                item.title = i_lc.title ?? ""
                item.des = i_lc.des ?? ""
                item.date = i_lc.date ?? ""
                return item
            }
            XPrint("DataManager onLoadNotification count: \(itemByLocal.count)")
            WatchConnectivityManager.share.notifications = itemByLocal
        } catch let error {
            XPrint("::DataManager onLoadNotification error: \(error.localizedDescription)")
        }
    }
}
-
onSaveNotificationsthis method will call when we receive new data from iPhone. We will add on classWatchConnectivityManager: NSObject, ObservableObject -
onLoadAndCatchonAppForNotification()this method will be called when app is loaded. We will add on theHomeViewstruct
Database Browser for SQLite
You can find the full path in container.loadPersistentStores
::DataManager container.loadPersistentStores: <NSPersistentStoreDescription: 0x600003fd0450> (type: SQLite, url: file:///Users/*****/Library/Developer/CoreSimulator/Devices/***/DataModels.sqlite)
Now you can browse the structure, data, and execute SQL commands as you wish:
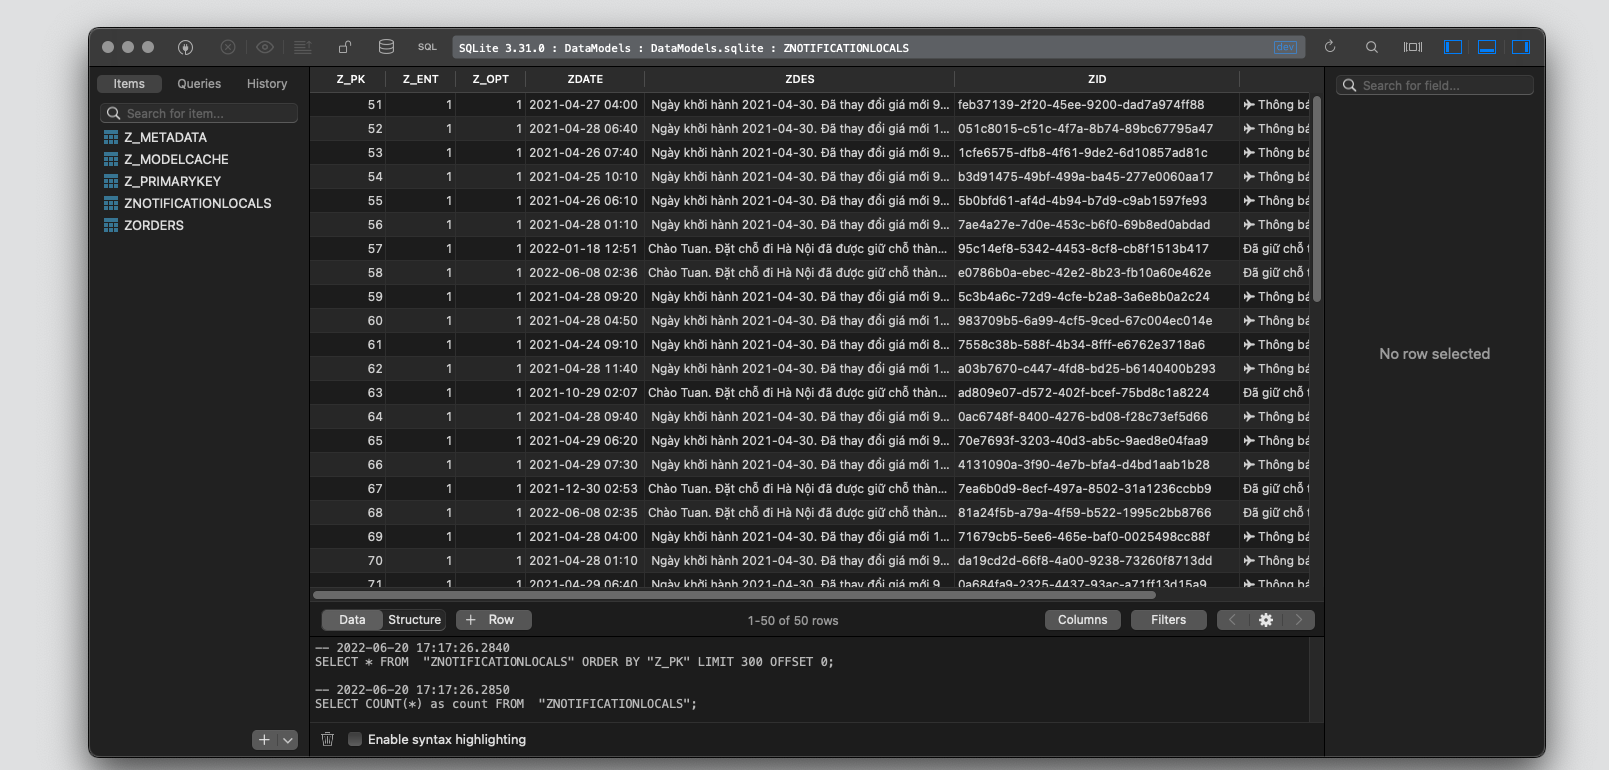
Database Browser
That’s it. We finished. Let’s to play demo
Store and load data demo
Conclusion
Well done, we learned how to use Core Data in SwiftUI to store data persistently and also understood what a managed ObjectContext is and how we can fetch stored data by using SwiftUI. This is end of apple watch series.
In the next post, I will summarize the knowledge from coming up with ideas to a real product. See you soon ^^
Posts in this Series
- Apple Watch Serial Summary
- Apple Watch Serial My Notification
- Apple Watch Serial - My Order Detail Screen
- Apple Watch Serial - My Order Screen
- Apple Watch Serial P2 Homescreen Complete
- Apple Watch Serial P2 Homescreen Connect
- Apple Watch Serial P1 Homescreen
- Let's Idea, How to Design Travel App (12Bay) on WatchOS?
- Apple Watch Series
