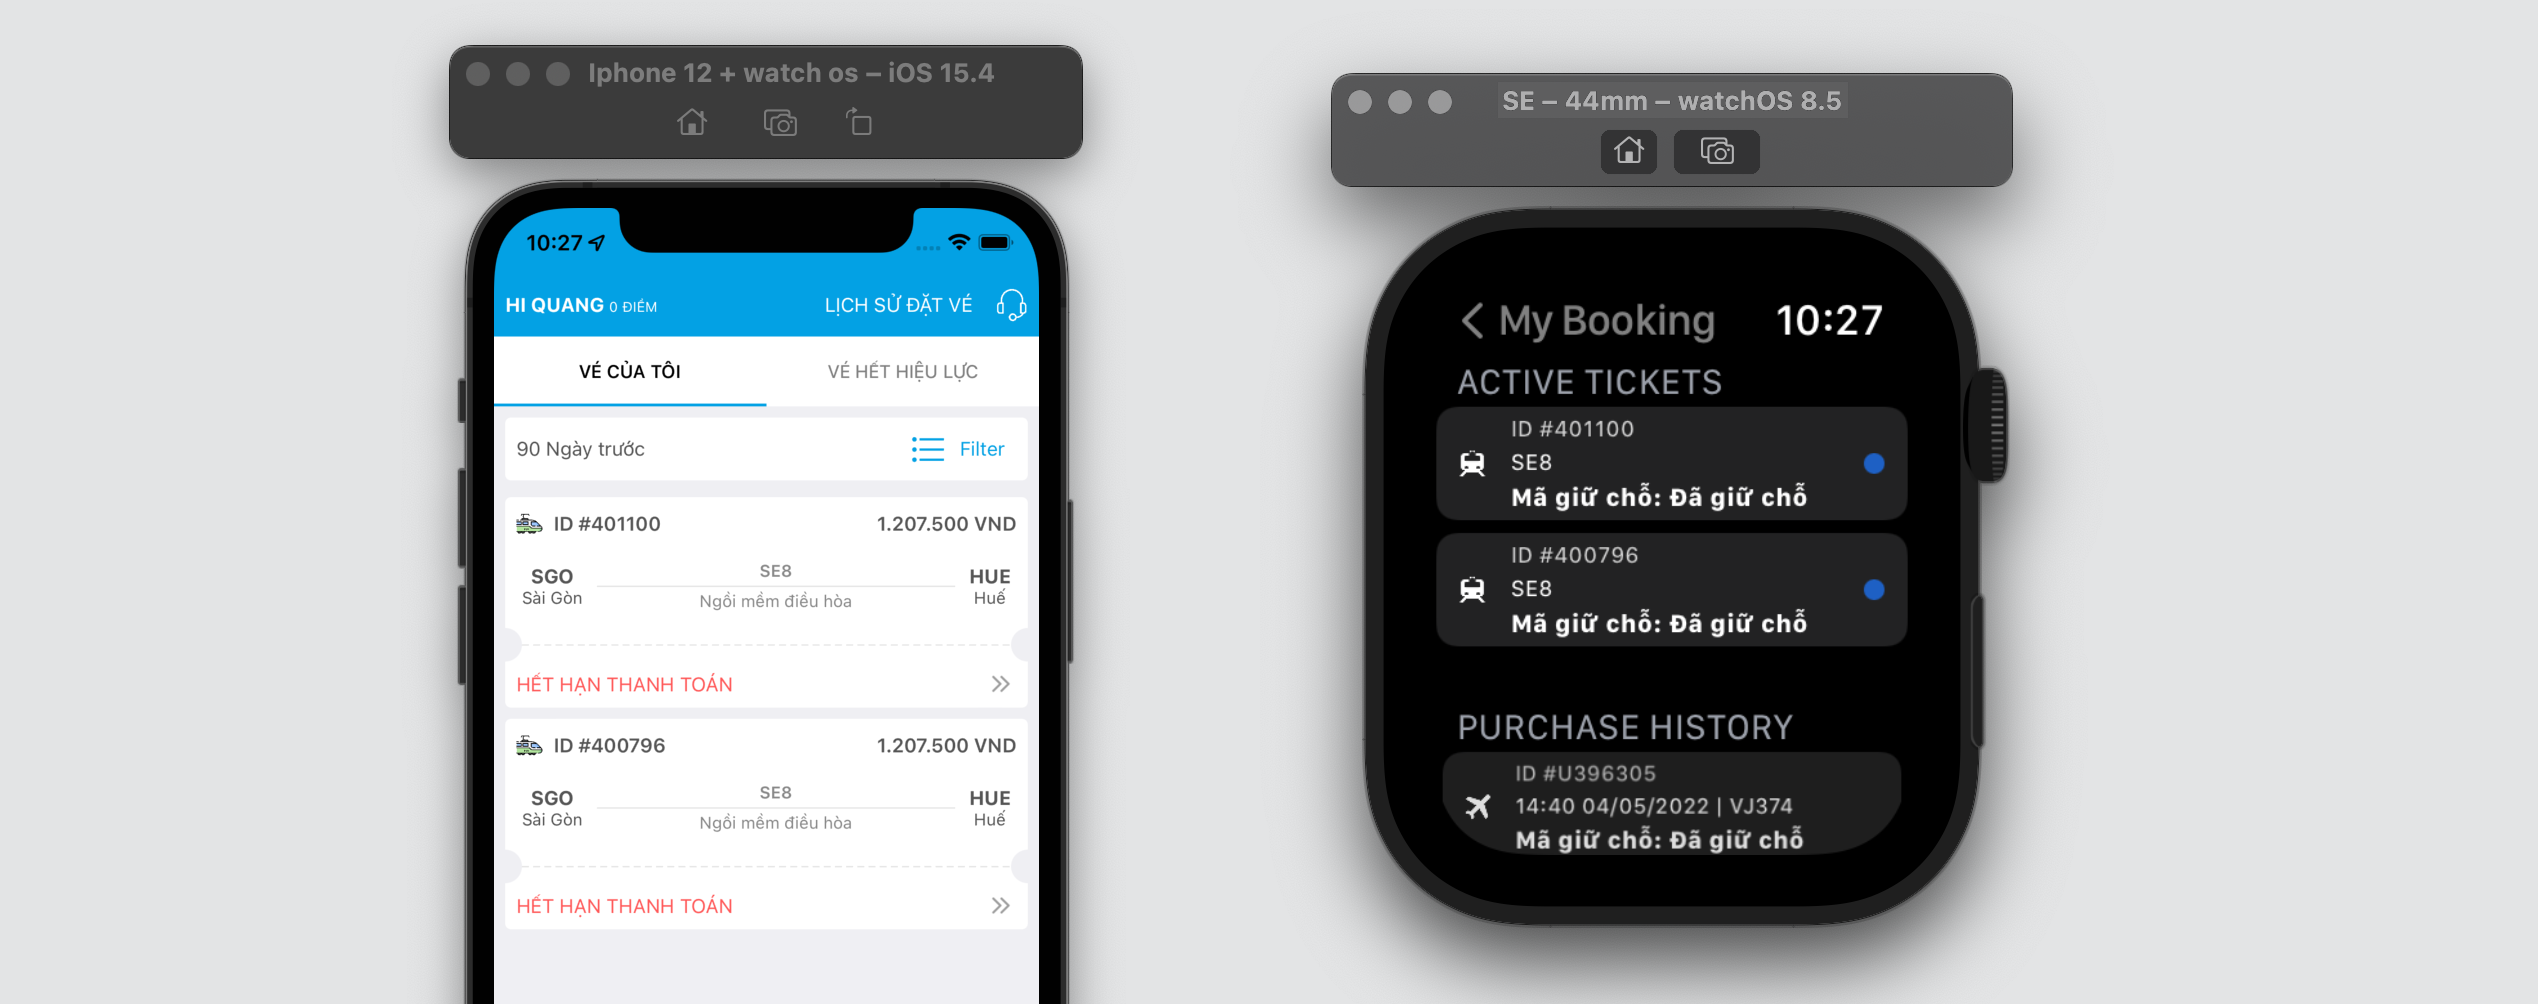
Apple Watch Serial - My Order Screen
Table of Contents
Today is a International Children’s Day. So, My wife and I bought a great gift for my daugher. It’s a beautiful life. In daily life, I always looking for ways to make my life more fun and interesting ^^
Abstract
Last post, We completed the home screen. Today, We will focus to design the my order and update data from iPhone app. Some of the main ideas you can got throught this post:
- Working on
SwiftUI. - Understand the
WatchConnectivityframework. - Understand the
Listelement. - Understand a navigation presentation
NavigationView,NavigationLink.
This article is part of my Apple Watch by SwiftUI series.
My Order UI design
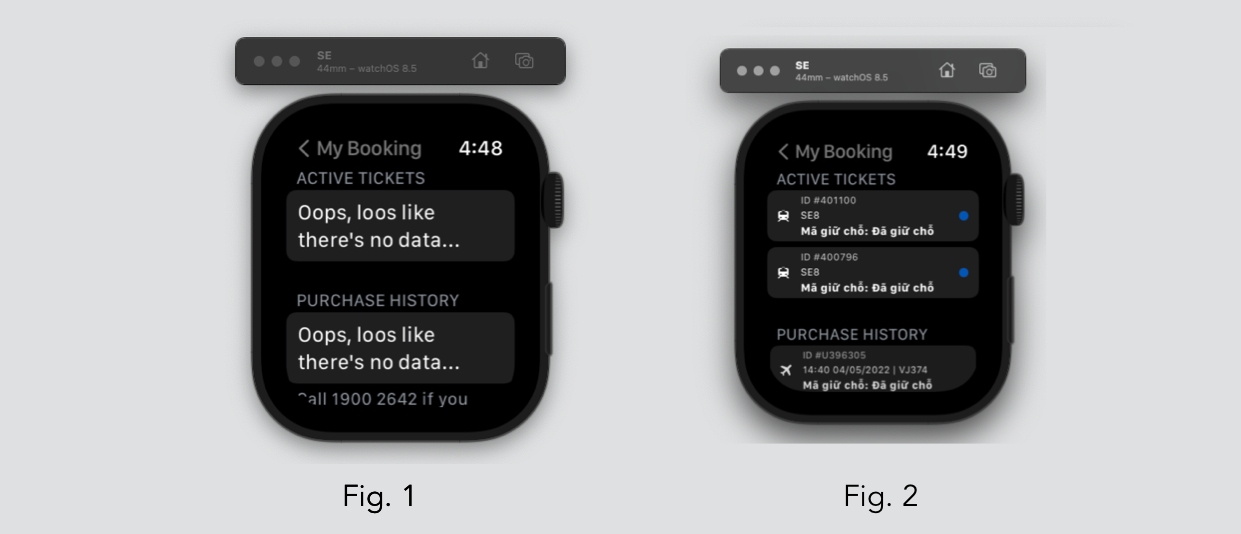
We will be buiding a single screen that displays a list of orders, and touch on any of the item will let you navigate to a different view to showing details about your booking. The my order screen illustrated as image below. Fig. 1 for the case of no data and Fig. 2 for the case of have active or non active tikets.

The my order design screen
Send data from iPhone to watch app
We are using the Watch Connectivity framework, you can implement two-way communication. In this post, I use sendMessage(dic, replyHandler: **nil**, errorHandler instead of transferUserInfo method for this demo. Please note that transferUserInfo run only real device not on simulator.
transferUserInfo(:_) method suits the most for our use case, but according to Apple documentation the system will not call the didReceiveUserInfo delegate method on simulator.
In iPhone Side
In the PhoneWatchConnectivityManager class (iOS project). I create sendMessage(byDic method to send message by dictionary type. Below is my method:
import Foundation
import WatchConnectivity

class PhoneWatchConnectivityManager: NSObject {

    static let shared = PhoneWatchConnectivityManager()

    fileprivate var sessionDef:WCSession? = nil

    private override init() {
        super.init()
        print("::PhoneWatchConnectivityManager init WCSession.default")
        self.sessionDef = WCSession.default
        self.sessionDef?.delegate = self
    }
}

//MARK:// Base funcs
extension PhoneWatchConnectivityManager {
      func sendMessage(byDic dic:[String : Any]) {
        self.sessionDef?.sendMessage(dic, replyHandler: nil, errorHandler: { error in
            print("::PhoneWatchConnectivityManager Cannot send message: \(String(describing: error))")
        })
    }
}
In my order on iPhone application, I will call this method to send data to apple watch when I get the data from server.
if let orderByDic:[String:Any]  = self.viewModel.getItemsByDic() {
    PhoneWatchConnectivityManager.shared.sendMessage(byDic: orderByDic)
}
getItemsByDic() is the method in the HistoryBookingRootViewModel class. The output is [String: Any]. Here is example code:
func getItemsByDic() -> [String: Any]? {
    guard let response:[ResultBookingDetail] = self.flightHistoryResponse?.data else { return nil}
    let itemByDics:[[String:Any]] = response.map { item in
        var itemByDic:[String:Any] = [:]
        itemByDic["type"] = item.type?.rawValue ?? ""
        itemByDic["id"] = item.getIdToView()
        itemByDic["date"] = item.getDateToShowAppleWatch()
        itemByDic["prnCode"] = item.getPNRCodeToView()
        itemByDic["isActive"] = item.isActiveTicket()
        return itemByDic
    }
    return [WatchConnectivityShareData.BOOKING_ORDER:itemByDics]
}
In Watch Side
In WatchConnectivityManager (watchOS project). We will receive message data via func session(_ session: WCSession, didReceiveMessage message: [String : Any]) method. After get the data, we convert type from dictionary to MyOrderListItemModel item model.
//
//  MyOrderListItemModel.swift
//  watchOS WatchKit Extension
//
//  Created by Tuan Truong Quang on 6/1/22.
//  Copyright © 2022 Truong Quang Tuan. All rights reserved.
//

import Foundation
import Foundation

struct MyOrderListItemModel : Identifiable {

    var id: String = UUID().uuidString

    var bookingId:String = ""
    var type:String = ""
    var date:String = ""
    var prnCode:String = ""
    var isActive:Bool = true

    init(byDic dic:[String:Any]) {
        self.bookingId = dic["id"] as? String ?? ""
        self.type = dic["type"] as? String ?? ""
        self.date = dic["date"] as? String ?? ""
        self.prnCode = dic["prnCode"] as? String ?? ""
        self.isActive = dic["isActive"] as? Bool ?? false
    }
}

extension MyOrderListItemModel {
    func getIcon() -> String {
        if self.type.uppercased() == "FLIGHT" { return "plane"}
        if self.type.uppercased() == "TRAIN" { return "icon-homeTrain"}
        if self.type.uppercased() == "BUS" { return "bus"}
        return "plane"
    }
}
Update data for view
Now, We update data when receive data on session didReceiveMessage method:
import os
import SwiftUI
import WatchConnectivity

class WatchConnectivityManager: NSObject, ObservableObject {
    private let wcSession: WCSession
    private let logger = Logger(subsystem: "WCExperimentsWatchApp", category: "WatchConnectivityService")

    @Published var notificationMessage: WatchMessageItemModel? = nil

    @Published var bookingOrder: [MyOrderListItemModel] = []

    static let share = WatchConnectivityManager()

    private override init() {
        self.wcSession = WCSession.default
        super.init()
        if WCSession.isSupported() {
            wcSession.delegate = self
            wcSession.activate()
        }
    }
}

extension WatchConnectivityManager: WCSessionDelegate {

    func session(_ session: WCSession, didReceiveMessage message: [String : Any]) {
        print("::WatchConnectivityService didReceiveMessage: \(message)")
        DispatchQueue.main.async { [weak self] in guard let strongSelf = self else { return }

            //Order
            if message.keys.contains(WatchConnectivityShareData.BOOKING_ORDER) {
                if let orderByDic = message[WatchConnectivityShareData.BOOKING_ORDER] as? [[String:Any]] {
                    strongSelf.bookingOrder = orderByDic.map { dic in
                        return MyOrderListItemModel.init(byDic: dic)
                    }
                    print("strongSelf.bookingOrder: \(strongSelf.bookingOrder)")
                }

            //Message
            } else if message.keys.contains(WatchConnectivityShareData.MESSAGE_KEY) {
                let messageByString:String = message[WatchConnectivityShareData.MESSAGE_KEY] as? String ?? "Error"
                strongSelf.notificationMessage = WatchMessageItemModel.init(messsage: messageByString)
            }
        }
    }
}
By marking the bookingOrder variable as @Published, it means that whenever there is any changes to the users variable, the instances of the class that are “subscribed” to it will be notified, prompting SwiftUI to re-render the View. The final step is to connect the data source to our View.
To do this, we will create an instance of the WatchConnectivityManager class in the ContentView. In order to “subscribe” to be notified of any changes to the data, we have to mark it with @StateObject:
import SwiftUI

struct MyOrderView: View {

    @StateObject fileprivate var service = WatchConnectivityManager.share

    var body: some View {
        NavigationView {
            List() {
                let activeTickets:[MyOrderListItemModel] = self.service.bookingOrder.filter({$0.isActive})
                let nonactiveTickets:[MyOrderListItemModel] = self.service.bookingOrder.filter({!$0.isActive})

                Section(header: Text("Active Tickets")) {
                    if activeTickets.isEmpty {
                        Text("Oops, loos like there's no data...")
                    } else {
                        ForEach(activeTickets) { item in
                            MyOrderListItemView.init(item: item)
                        }
                    }
                }.headerProminence(.increased)
                Section(header: Text("Purchase History"), footer: Text("Call 1900 2642 if you have any problems")) {
                    if nonactiveTickets.isEmpty {
                        Text("Oops, loos like there's no data...")
                    } else {
                        ForEach(nonactiveTickets) { item in
                            MyOrderListItemView.init(item: item)
                        }
                    }
                }.headerProminence(.standard)
            }
            .listStyle(.automatic)
        }
        .navigationTitle("My Booking")
    }
}
And MyOrderListItemView is a element on List. It is like a row in UITableView on UIKit world @@.
//
//  MyOrderListItemView.swift
//  watchOS WatchKit Extension
//
//  Created by Tuan Truong Quang on 6/1/22.
//  Copyright © 2022 Truong Quang Tuan. All rights reserved.
//

import SwiftUI

struct MyOrderListItemView: View {

    var item:MyOrderListItemModel

    var body: some View {
        HStack.init(alignment: .center, spacing: 2.0) {
            Image(self.item.getIcon())
                .resizable() // it will sized so that it fills all the available space
                .frame(width: 10.0, height: 10.0, alignment: .center)

            VStack(alignment: .leading, spacing: 2.0) {
                Text(self.item.bookingId).font(.system(size: 9.0)).opacity(0.8).padding(.leading, 8.0)
                Text(self.item.date).font(.system(size: 9.0)).opacity(1.0).padding(.leading, 8.0)
                Text(self.item.prnCode).font(.system(size: 10.0)).fontWeight(.bold).padding(.leading, 8.0)
            }
            Spacer()
            Circle()
                .foregroundColor(Color.init(hex: 0x1D67D6).opacity(0.9))
                .frame(width: 8.0, height: 8.0)
                .padding(.trailing, 0)
                .opacity(self.item.isActive ? 1.0 : 0.0)
        }
    }
}
List(UITableView in UIKit World): A container that presents rows of data arranged in a single column (static scrollable list). Here are some tutorial to deep dive:
Navigation
SwiftUI has introduced the NavigationView and NavigationLink structs. These two pieces work together to allow navigation between views in your application. The NavigationView is used to wrap the content of your views, setting them up for subsequent navigation. The NavigationLink does the actual work of assigning what content to navigate to and providing a UI component for the user to initiate that navigation.
When a menu item is tapped, we want to bring in a detail view that shows more information. We already placed ContentView inside a NavigationView, so now we can use a new view type called NavigationLink. We need to give this a destination – what kind of thing it should show – then provide everything inside the link as a closure.
So, to achieve this use this code for a HomeView:
struct HomeView: View {

    @StateObject fileprivate var service = WatchConnectivityManager.share

    fileprivate let backgroundImages = ["home-bg", "home-bg1", "home-bg2", "home-bg3", "home-bg4"]

    var body: some View {
        NavigationView {
            ...

            HStack.init(alignment: .center, spacing: 8.0) {

                NavigationLink(destination: MyOrderView()) {
                    HomeItemView(item: .init(title: "All Bookings", icon: "calendar"))
                }.buttonStyle(.plain)

            }.padding(.top, 4.0)

            ...
        }
        .navigationTitle("12Bay")
        .navigationBarTitleDisplayMode(.inline)
        .navigationViewStyle(.stack)
        .navigationBarHidden(false)
        .navigationBarTitleDisplayMode(.inline)
    }
}
- NavigationLink : Use this to push a new view onto the navigation stack.
.buttonStyle(.plain): set transparent for overlay color.
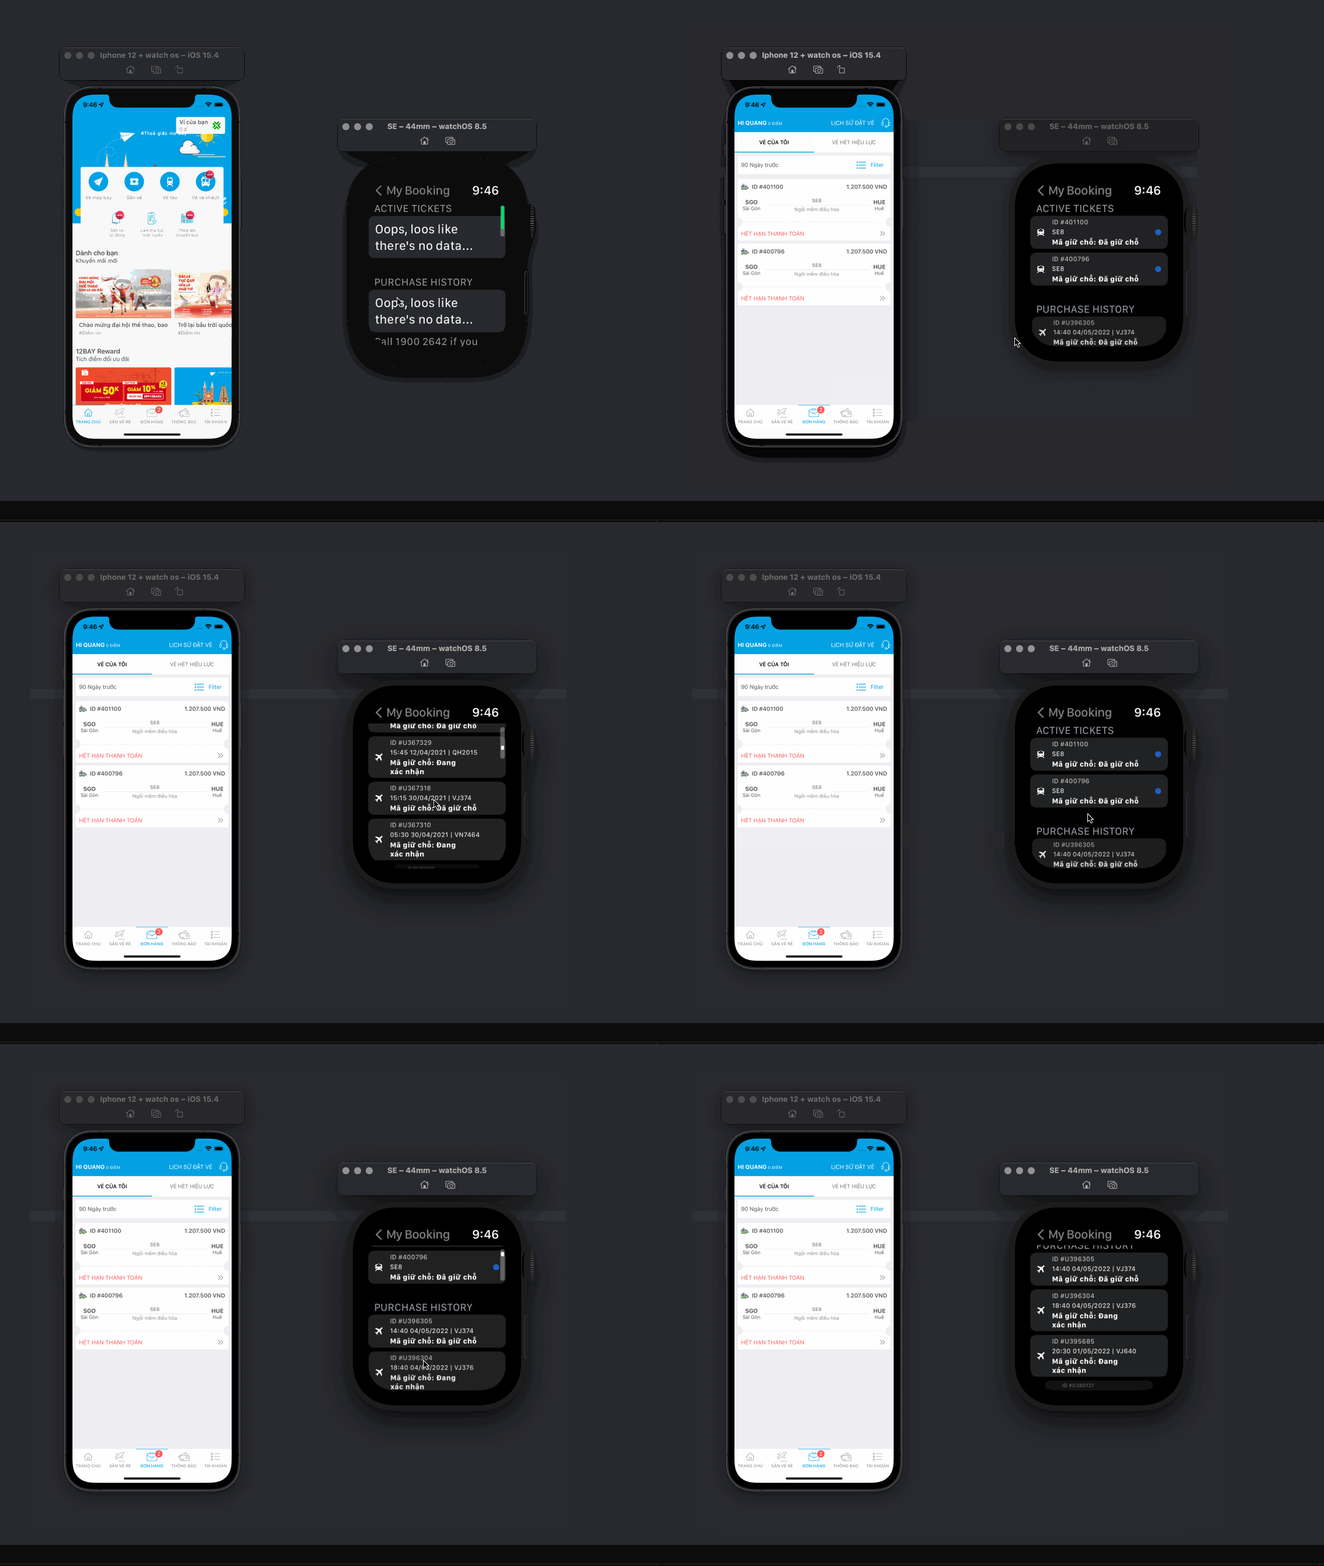
Well done, Our my order is now finalized. Let’s to play.

My Order Screen
Conclusion
And that’s how we use Watch Connectivity and learn some important components, e.g. List, NavigationLink, Stack. In the next post, we will look into the order detail screen. Thanks for reading, and until next time!
Posts in this Series
- Apple Watch Serial Summary
- Apple Watch Serial My Notification
- Apple Watch Serial - My Order Detail Screen
- Apple Watch Serial - My Order Screen
- Apple Watch Serial P2 Homescreen Complete
- Apple Watch Serial P2 Homescreen Connect
- Apple Watch Serial P1 Homescreen
- Let's Idea, How to Design Travel App (12Bay) on WatchOS?
- Apple Watch Series