
Apple Watch Serial - My Order Detail Screen
Table of Contents
Abstract
Today, we will create an order detail UI screen and update data for this. This view to show all informations about order, e.g. booking ID, departing, arriving. Through this post, you can learn some knowledge such as:
-
Working on
SwiftUI. -
Understand the
List,ZStack,TabViewelement. -
Understand a navigation presentation
NavigationView,NavigationLink.
This article is part of my Apple Watch by SwiftUI series.
UI design
We will create a simple screen to display the full details of an order. Some information needs to be clearly to show such as:
- Booking ID, (PRN Code for flight)
- Departure time
- Arrival time
So, here is my design:
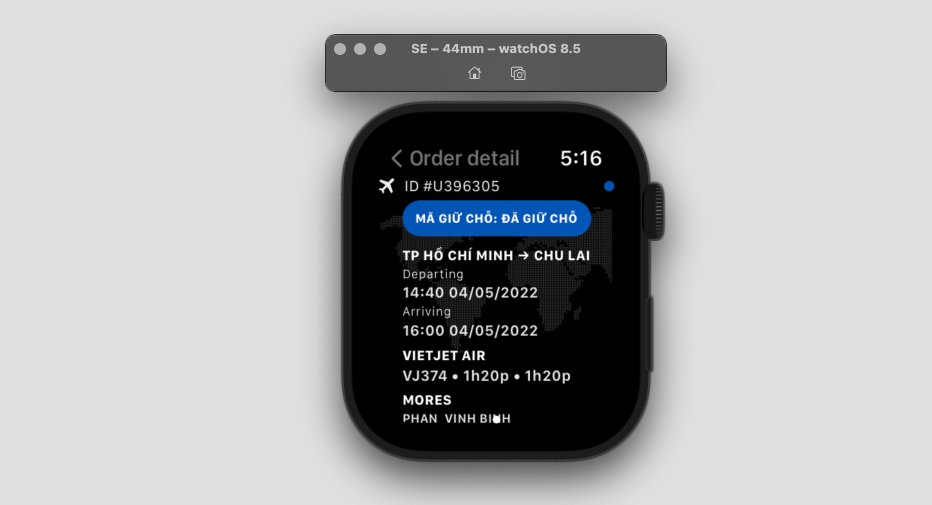
Order Detail Design
Related knowledge
In this case, we will create two pages to show the one-way or round-trip. So, I chose TabView to do this.
TabView
Define: (Structure): A view that switches between multiple child views using interactive user interface elements. SwiftUI gives us a TabView for just this purpose, and it works much like a UITabBarController (UIKit World).
SDKs: iOS 13.0+, Mac Catalyst 13.0+, macOS 10.15+, tvOS 13.0+, watchOS 7.0+
Supporting Types
var body: some View: The content and behavior of the view.typealias Body: The type of view representing the body of this view.
Example iOS
To create a user interface with tabs, place views in a TabView and apply the tabItem(_:) modifier to the contents of each tab. On iOS, you can also use one of the badge modifiers, like badge(_:), to assign a badge to each of the tabs.
The following example creates a tab view with three tabs, each presenting a custom child view. The first tab has a numeric badge and the third has a string badge.
TabView {
    ReceivedView()
        .badge(2)
        .tabItem {
            Label("Received", systemImage: "tray.and.arrow.down.fill")
        }
    SentView()
        .tabItem {
            Label("Sent", systemImage: "tray.and.arrow.up.fill")
        }
    AccountView()
        .badge("!")
        .tabItem {
            Label("Account", systemImage: "person.crop.circle.fill")
        }
}
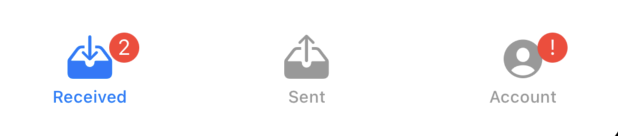
source: developer.apple.com
Use a Label for each tab item, or optionally a Text, an Image, or an image followed by text. Passing any other type of view results in a visible but empty tab item.
Let’s Code
Here is a full code of OrderDetailView struct, these include two sub views:
OrderDetailDateView: Display the booking id information.OrderDetailFlightView: Display detail information.
import SwiftUI

struct OrderDetailView: View {
    var detail:MyOrderDetailItemModel
    var body: some View {
        VStack.init(alignment: .center, spacing: 0.0) {
            LazyHStack {
                OrderPageView(detail: detail)
            }
            Spacer()
        }.navigationTitle("Order detail")
    }
}

struct OrderPageView: View {

    var detail:MyOrderDetailItemModel

    var body: some View {
        let screenBounds:CGRect = WKInterfaceDevice.current().screenBounds
        let slides:[MyOrderFullDetailItemModel] = self.detail.getPageSlide()
        TabView {
            ForEach(slides) { item in
                ZStack.init {
                    Image("bgHeader")
                        .resizable()
                        .aspectRatio(contentMode: .fit)
                    VStack(alignment: .leading, spacing: 4.0) {
                        ScrollView {
                            OrderDetailDateView.init(item: self.detail).padding(.top, 2.0)
                            OrderDetailFlightView.init(bookDetail: self.detail, detail: item)
                        }
                    }
                }
            }
        }
        .frame(width: screenBounds.width, height: screenBounds.height)
        .tabViewStyle(.page)
    }
}
TabView you need to set a frame for this element .frame(width: screenBounds.width, height: screenBounds.height) and using .tabViewStyle(.page) if you want to show the page style.
OrderDetailDateView
Thought the previous posts, we are familiar with SwiftUI elements, so we are easy to create this view. The full code below:
import SwiftUI

struct OrderDetailDateView: View {

    var item:MyOrderDetailItemModel

    var body: some View {
        HStack(alignment: .center, spacing: 8.0) {
            Image(self.item.type.getIcon()).resizable().frame(width: 12.0, height: 12.0, alignment: .center).opacity(0.94)
            Text(self.item.bookingId).font(.system(size: 12.0)).opacity(0.94)
            Spacer()
            Circle()
                .foregroundColor(Color.init(hex: 0x1D67D6).opacity(0.9))
                .frame(width: 8.0, height: 8.0)
                .padding(.trailing, 0)
        }
    }
}

struct OrderDetailDateView_Previews: PreviewProvider {
    //static let devices:[String] = ["Apple Watch Series 6 - 44mm", "Apple Watch SE - 40mm"]
    static let devices:[String] = ["Apple Watch Series 6 - 44mm"]
    static var previews: some View {
        ForEach(HomeView_Previews.devices, id: \.self) { devicesName in
            OrderDetailDateView.init(item: MyOrderDetailItemModel())
                .previewDevice(PreviewDevice(rawValue: devicesName))
                .previewDisplayName(devicesName)
        }
    }
}
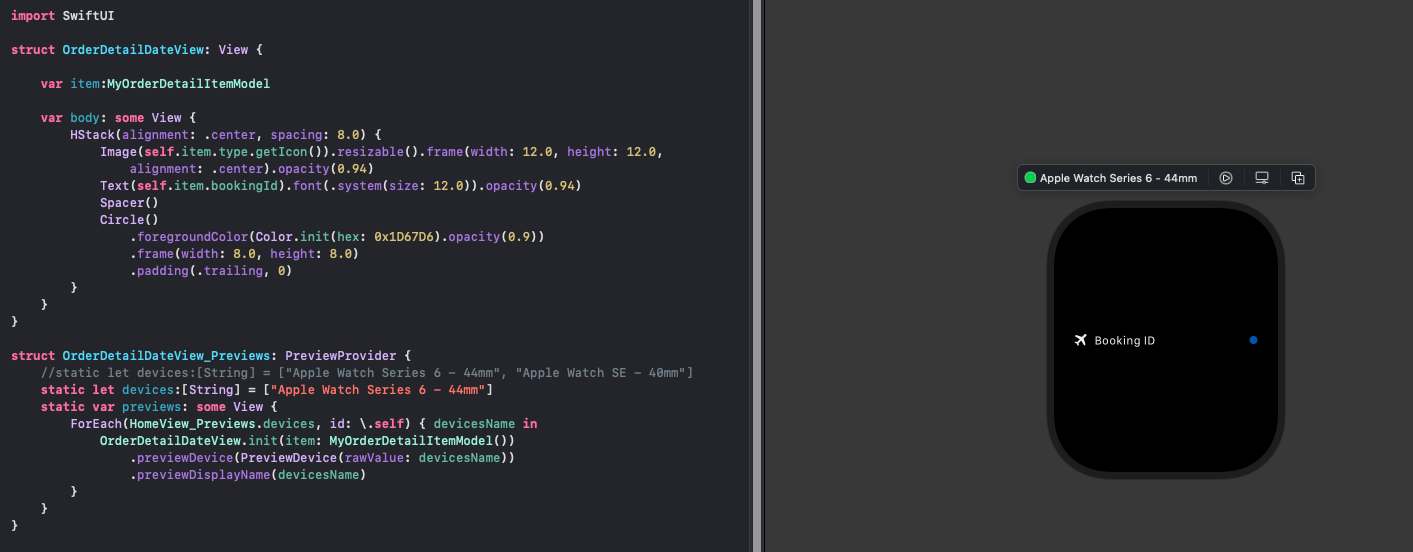
OrderDetailDateView Previews
OrderDetailFlightView
import SwiftUI

struct OrderDetailFlightView: View {

    var bookDetail:MyOrderDetailItemModel
    var detail:MyOrderFullDetailItemModel

    var body: some View {

        VStack(alignment: .center, spacing: 4.0) {
            Text(self.bookDetail.prnCode.uppercased()).font(.system(size: 10.0, weight: .bold, design: .default))
                .padding(.leading, 10.0).padding(.trailing, 10.0).padding(.top, 8.0).padding(.bottom, 8.0)
                .background(Color.init(hex: 0x1D67D6).opacity(0.9)).cornerRadius(20.0)
            VStack(alignment: .leading, spacing: 1.4) {
                Text(self.detail.road).font(.system(size: 11.0, weight: .bold, design: .default)).padding(.top, 4.0)
                Text("Departing").font(.system(size: 10.0, weight: .light, design: .default))
                Text(self.detail.departureDateTime).font(.system(size: 12.0, weight: .semibold, design: .default)).opacity(0.9)
                Text("Arriving").font(.system(size: 10.0, weight: .light, design: .default))
                Text(self.detail.arriverDateTime).font(.system(size: 12.0, weight: .semibold, design: .default)).opacity(0.9)
                Text(self.detail.vehicle.uppercased()).font(.system(size: 11.0, weight: .bold, design: .default)).padding(.top, 4.0)
                Text(self.detail.vehicleDetail).font(.system(size: 12.0, weight: .semibold, design: .default)).opacity(0.9)
                Text("MORES").font(.system(size: 11.0, weight: .bold, design: .default)).padding(.top, 4.0)
                Text(self.bookDetail.cusInfo).font(.system(size: 10.0, weight: .semibold, design: .default)).opacity(0.9)
            }
        }
    }
}

struct OrderDetailFlightView_Previews: PreviewProvider {
    //static let devices:[String] = ["Apple Watch Series 6 - 44mm", "Apple Watch SE - 40mm"]
    static let devices:[String] = ["Apple Watch Series 6 - 44mm"]
    static var previews: some View {
        ForEach(HomeView_Previews.devices, id: \.self) { devicesName in
            OrderDetailFlightView.init(bookDetail: MyOrderDetailItemModel(), detail: MyOrderFullDetailItemModel())
                .previewDevice(PreviewDevice(rawValue: devicesName))
                .previewDisplayName(devicesName)
        }
    }
}
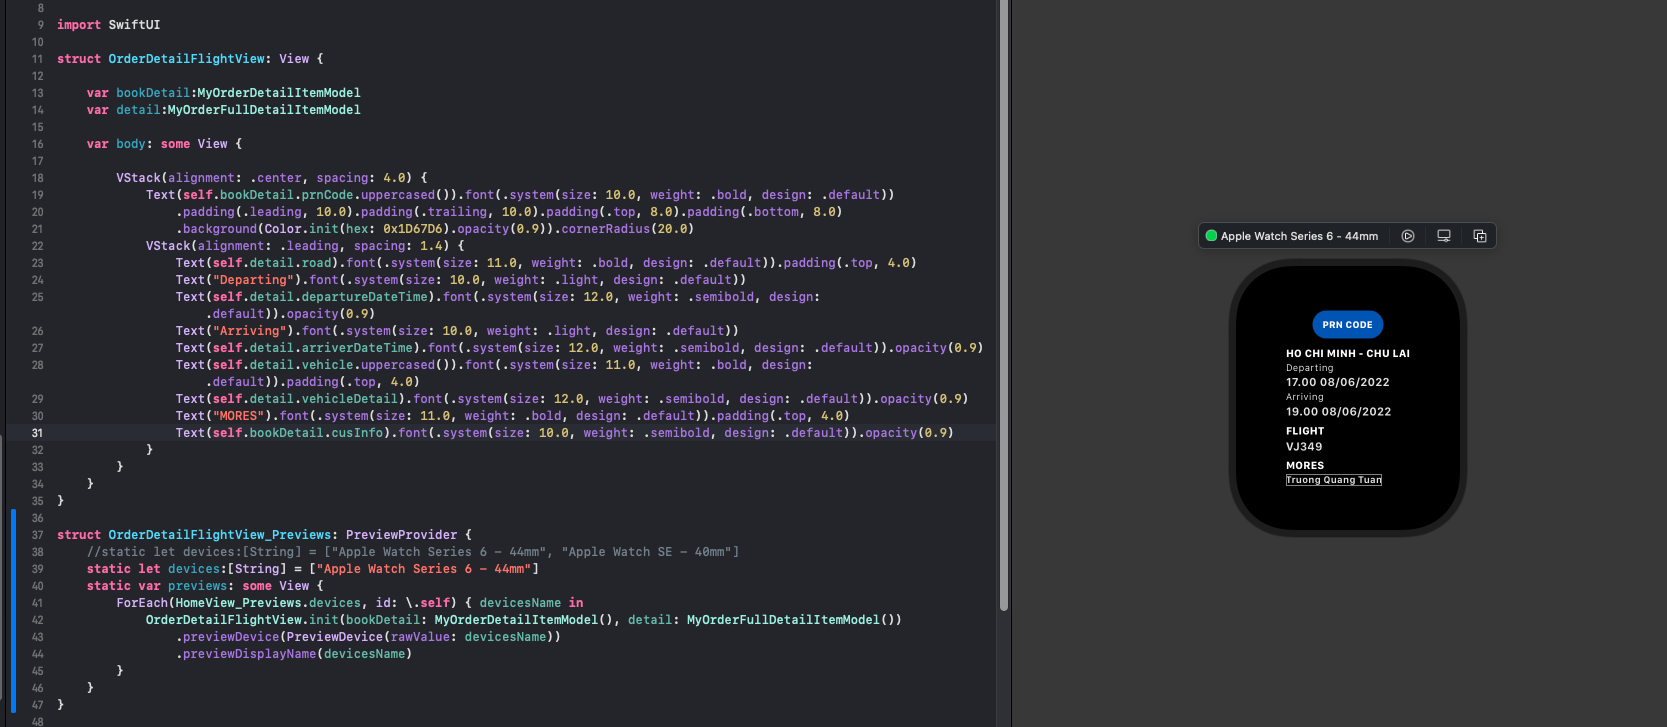
OrderDetailFlightView Previews
Alright, That is all the order detail. You can see the final result:
Order Detail Screen
Conclusion
Thought this post, we can use the TabView to build the page slider on watchos. In the next post, we will create the final notification screen and that is end of apple-watch series. Thanks for reading this post, if you enjoyed, please share it with others.
Posts in this Series
- Apple Watch Serial Summary
- Apple Watch Serial My Notification
- Apple Watch Serial - My Order Detail Screen
- Apple Watch Serial - My Order Screen
- Apple Watch Serial P2 Homescreen Complete
- Apple Watch Serial P2 Homescreen Connect
- Apple Watch Serial P1 Homescreen
- Let's Idea, How to Design Travel App (12Bay) on WatchOS?
- Apple Watch Series
