Apple Watch Serial P1 Homescreen
Table of Contents
Abstract
I have a long holiday with my family in my hometown. So it’s a beautiful life. Today, we begin to code a home screen. In this post, We will learn to use basic SwiftUI to build UIs for apple watch application. Here are some keys you will get through this topic:
-
Create a new watchOS target inside of our existing iOS project.
-
Understand the WatchKit App.
-
What’s SwiftUI, and how is it different than UIKit?
-
The fundamental component in SwiftUI: Views, Image, NavigationView, ect.
-
Working with stacks, such as the VStack, HStack and ZStack.
This article is part of my Apple Watch by SwiftUI series.
Previously : Let’s Idea, How to Design Travel App (12Bay) on WatchOS?
Let’s do it.
Create 12Bay WatchOS App
To create a watchOS App target to an existing iOS project we need to select: File -> New -> Target and select Watch App for iOS App under watchOS tab.

When the target is created, we get two new folders named <ProductName> and <ProductName> Extension.
- The <ProductName> folder : Where our watchOS app’s storyboard(s) and the assets used by the storyboard(s) are stored.
- The <ProductName> Extension folder: This the area to store the code files.

Now that we have our iOS and Watch app “working”, let’s enable communication between them.
Understand the WatchKit App and WatchKit Extension
Regardless of whether you add a watchOS app to an existing project or create a new project that contains both an iOS and watchOS app, Xcode automatically configures the targets for your watchOS app and adds the needed files, as image bellow:

(source: developer.apple.com)
- WatchKit App
An app bundle that contains your watchOS app’s storyboard and any assets used by the storyboard.
- WatchKit Extension
An extension that contains your watchOS app’s code.
Xcode sets the bundle IDs for both of the watch targets based on the container’s ID. For a watch-only app, this ID is the bundle ID for the root target. For a watchOS app with an iOS app, this ID is the iOS app’s bundle ID. The root of the WatchKit app and WatchKit extension’s bundle IDs must match the container’s bundle ID. If you change your iOS app’s bundle ID, you must update the other bundle IDs accordingly.
When developing your watchOS app, edit your app’s storyboard in the WatchKit app, and write your app’s code in the WatchKit extension. Your WatchKit extension connects to controls and views in the storyboard using WKInterfaceObject subclasses such as WKInterfaceButton and WKInterfaceLabel. These interface objects act as proxies for your storyboard elements. Use the interface elements to configure the elements in code.
Watch Connectivity
One more things, the goal is to send the result from the iOS app and present it in the watch app.
Watch Connectivity Implement two-way communication between an iOS app and its paired watchOS app.
Use this framework to transfer data between your iOS app and the WatchKit extension of a paired watchOS app. You can pass small amounts of data or entire files. You also use this framework to trigger an update to your watchOS app’s complication.

Let’s start to code homescreen
Here is homescreen design, There are three main function to show:
-
Show the recent booking
-
View all booking
-
View all notification

First one, Let’s to learn some basic view
Rip constraints

(source: stackoverflow.com)
SwiftUI doesn’t use layout constraints. UIKit is still around, it’s not deprecated and fully functional, so if you continue to use the classic approach, you can use as many constraints as you wish.
However, if you choose to go with SwiftUI → rest in peace, constraints!
Layout
SwiftUI layout system is different from UIKit. It asks each child view to calculate its own size based on the bounds of its parent view. Next, asks each parent to position its children within its own bounds. More detail you can find here: how layout work in swiftUI - hackingwithswift
UIKit equivalent in SwiftUI
Integrate SwiftUI views into existing apps, and embed UIKit views and controllers into SwiftUI view hierarchies.
| UIKit | SwiftUI | Note |
|---|---|---|
| UIView (UIHostingController) | View | There is no direct convert to UIView, but you can use container view to add view from UIViewController into view hierarchy |
| UIViewController (UIHostingController) | View |
Views and Controls
| UIKit | SwiftUI | Note |
|---|---|---|
| UILabel | Text, Label | |
| UITabBar | TabView | |
| UITabBarItem | TabView | .tabItem under TabView |
| UITextField | TextField | For password (isSecureTextEntry) use SecureField |
| UITextView | TextEditor | iOS 14 |
| UITableView | List | also VStack and Form |
| UINavigationBar | NavigationView | Part of NavigationView |
| UINavigationItem | ToolbarItem | iOS 14 |
| UIBarButtonItem | NavigationView | .navigationBarItems in NavigationView |
| UICollectionView | LazyVGrid and LazyHGrid | iOS 14 |
| UIStackView | HStack, LazyHStack | .axis == .Horizontal |
| UIStackView | VStack, LazyVStack | .axis == .Vertical |
| UIScrollView | ScrollView | |
| UIActivityIndicatorView | ProgressView with CircularProgressViewStyle |
iOS 14 |
| UIImageView | Image | |
| UIPickerView | Picker | |
| UIButton | Button, Link | |
| UIDatePicker | DatePicker | |
| UIPageControl | iOS 14. Auto add to TabView with PageTabViewStyle style. You can control its appearance by .indexViewStyle. |
|
| UIProgressView | ProgressView | iOS 14 |
| UISegmentedControl | Picker | A style (SegmentedPickerStyle) of Picker |
| UISlider | Slider | |
| UIStepper | Stepper | |
| UISwitch | Toggle | |
| UIToolBar | NavigationView with .toolbar |
iOS 14 |
| MKMapView | Map | import MKMapView to use this view |
(source: https://goshdarnswiftui.com/)
We will learn about some main controls in the following articles. So let to focus to code homescreen.
HomeScreen
First one, we will create homeItemView and after that create full screen HomeView

Home Screen
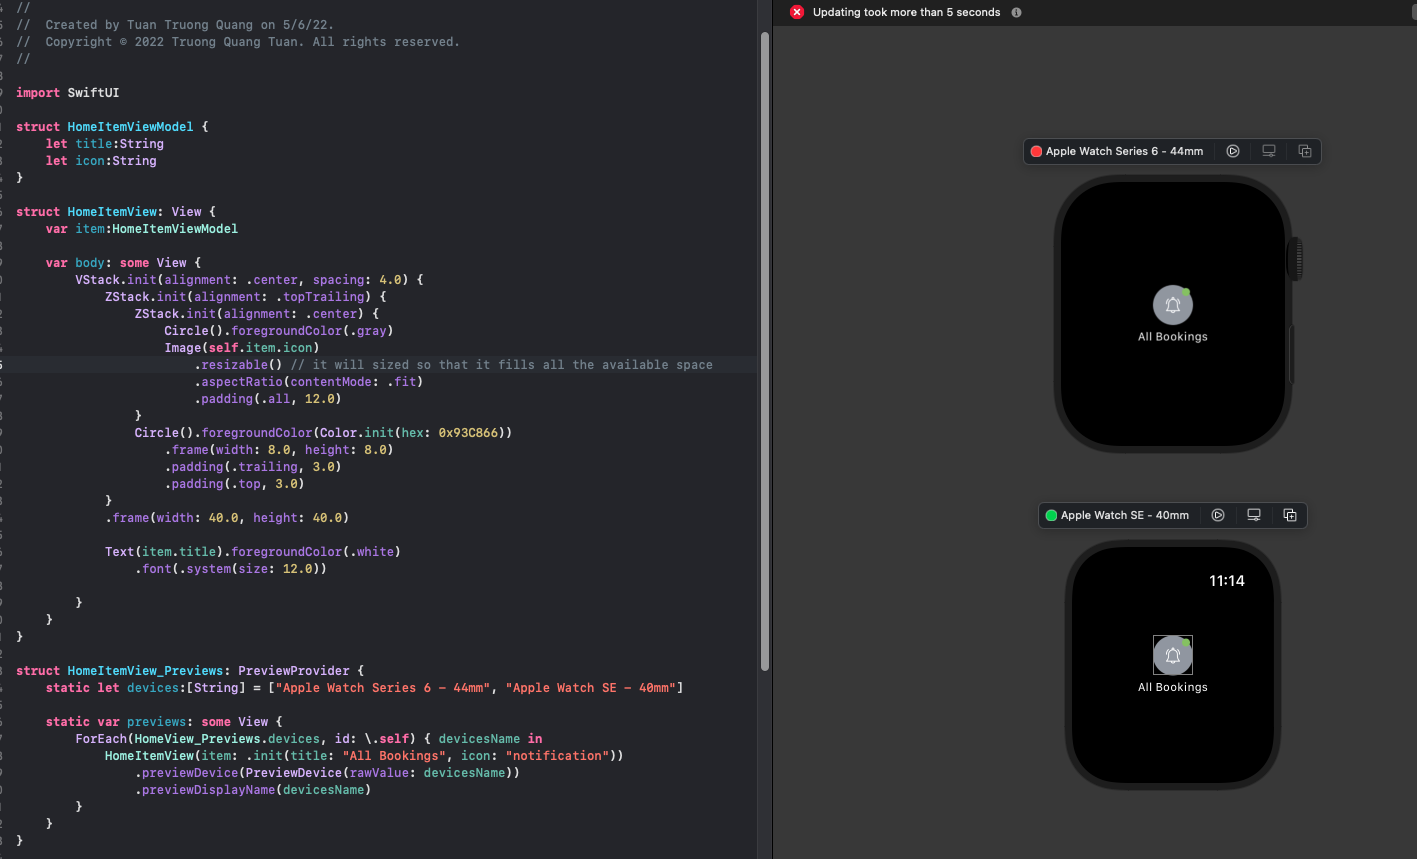
HomeItemView
Create HomeItemView file by click File -> NewFile -> File -> SwiftUI View. Xcode automatically inserts a preview structure at the bottom of the file that you can configure. So, we have two elements: View and PreviewProvider.
-
<StructName> : View: We will code here. This is a area to create custom views by declaring types that conform to the
Viewprotocol. Implement the requiredbodycomputed property to provide the content for your custom view. -
<StructName> :PreviewProvider: A type that produces view previews in Xcode.
struct HomeItemViewModel {
    let title:String
    let icon:String
}

struct HomeItemView: View {
    var item:HomeItemViewModel

    var body: some View {
        VStack.init(alignment: .center, spacing: 4.0) {
            ZStack.init(alignment: .topTrailing) {
                ZStack.init(alignment: .center) {
                    Circle().foregroundColor(.gray)
                    Image(self.item.icon)
                        .resizable() // it will sized so that it fills all the available space
                        .aspectRatio(contentMode: .fit)
                        .padding(.all, 12.0)
                }
                Circle().foregroundColor(Color.init(hex: 0x93C866))
                    .frame(width: 8.0, height: 8.0)
                    .padding(.trailing, 3.0)
                    .padding(.top, 3.0)
            }
            .frame(width: 40.0, height: 40.0)

            Text(item.title).foregroundColor(.white)
                .font(.system(size: 12.0))

        }
    }
}
struct HomeItemView_Previews: PreviewProvider {
    static let devices:[String] = ["Apple Watch Series 6 - 44mm", "Apple Watch SE - 40mm"]

    static var previews: some View {
        ForEach(HomeView_Previews.devices, id: .self) { devicesName in
            HomeItemView(item: .init(title: "All Bookings", icon: "notification"))
                .previewDevice(PreviewDevice(rawValue: devicesName))
                .previewDisplayName(devicesName)
        }
    }
}
-
Stack: The core concept to align views with each other is using stacks:HStack: A vertical stack, which shows views in a top-to-bottom listVStack: A horizontal stack, which shows views in a left-to-right listZStack: If you want to overlay views (i.e. put one view on top of another), you can use this view.
One more things,
SpacerA flexible space that expands along the major axis of its containing stack layout, or on both axes if not contained in a stack. SwiftUI’sSpacerviews automatically fill up all available space on their axis of expansion.We will learn more about it in the next posts. Fig below ilustration about this.

(SwiftUI layout examples with Stack Views - source: https://swdevnotes.com/)

(Stack layout - source: https://jonquach.com/)
-
Multiple previews: The first time I found
SwiftUIinteresting was when I able to previews multiple devices on the same time. Because we build an applewatch app, so I choose two devices: “Apple Watch Series 6 - 44mm”, “Apple Watch SE - 40mm”. You can find device name by this code bellow and run it on terminal.xcrun simctl list devicetypesWell, That’s it. We finished to create reuse homeItem view. Easy right! Next, let to create full home screen now.
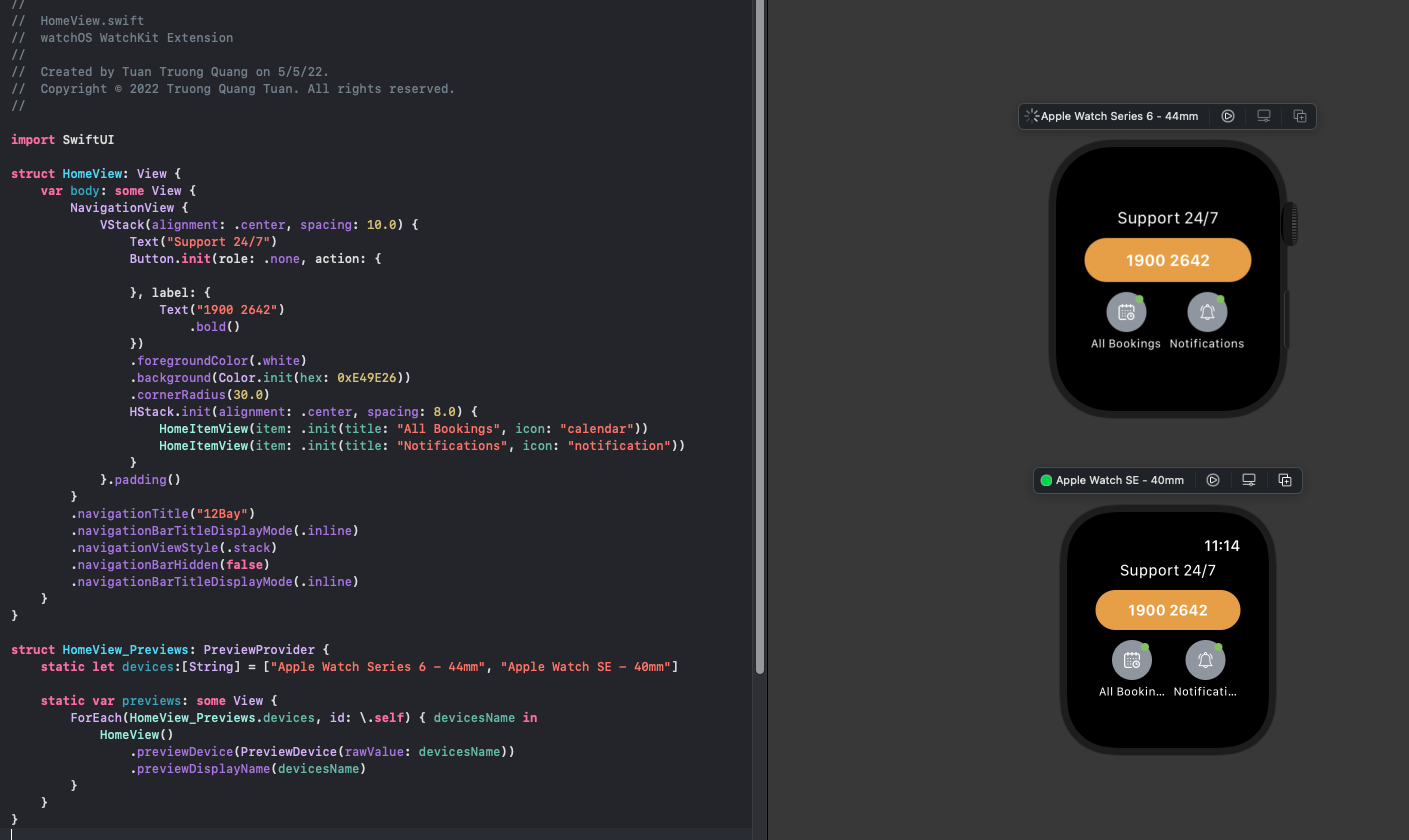
HomeView
import SwiftUI

struct HomeView: View {
    var body: some View {
        NavigationView {
            VStack(alignment: .center, spacing: 10.0) {
                Text("Support 24/7")
                Button.init(role: .none, action: {

                }, label: {
                    Text("1900 2642")
                        .bold()
                })
                .foregroundColor(.white)
                .background(Color.init(hex: 0xE49E26))
                .cornerRadius(30.0)
                HStack.init(alignment: .center, spacing: 8.0) {
                    HomeItemView(item: .init(title: "All Bookings", icon: "calendar"))
                    HomeItemView(item: .init(title: "Notifications", icon: "notification"))
                }
            }.padding()
        }
        .navigationTitle("12Bay")
        .navigationBarTitleDisplayMode(.inline)
        .navigationViewStyle(.stack)
        .navigationBarHidden(false)
        .navigationBarTitleDisplayMode(.inline)
    }
}

struct HomeView_Previews: PreviewProvider {
    static let devices:[String] = ["Apple Watch Series 6 - 44mm", "Apple Watch SE - 40mm"]

    static var previews: some View {
        ForEach(HomeView_Previews.devices, id: .self) { devicesName in
            HomeView()
                .previewDevice(PreviewDevice(rawValue: devicesName))
                .previewDisplayName(devicesName)
        }
    }
}
NavigationViewis one of the most important components of aSwiftUIapp, allowing us to push and pop screens with ease, presenting information in a clear, hierarchical way for users.
Home Screen
Now, You can click to run from XCode and an interesting screen will appear.
Conclusion
With SwiftUI, building an independent watch app has never become so much simple and fast. We’re able to apply our learning to create unique app experiences across Apple platform. In the next part I will go over establishing watch connectivity to send data back and forth between your iPhone and watch to update the UI and furthermore, we build another main screen, such as notifications or orders. So Happy coding ^^
And, I think that
Practice is the best way to learn anything. “Learn By Doing, Practicing and Not Just Reading”
Posts in this Series
- Apple Watch Serial Summary
- Apple Watch Serial My Notification
- Apple Watch Serial - My Order Detail Screen
- Apple Watch Serial - My Order Screen
- Apple Watch Serial P2 Homescreen Complete
- Apple Watch Serial P2 Homescreen Connect
- Apple Watch Serial P1 Homescreen
- Let's Idea, How to Design Travel App (12Bay) on WatchOS?
- Apple Watch Series
