
Understand Safe Area in SwiftUI
Table of Contents
Abstract
In this article, we will learn about Safe Area in SwiftUI. This article is part of the SwiftUI Series - SwiftUI Series - Updating TTBaseUIKit to support SwiftUI
Related knowledge
What is the Layout?
In the Apple ecosystem, Layout refers to the process of arranging and positioning user interface elements such as views and controls on a screen or within a container view using layout constraints, Auto Layout, or SwiftUI.
What Is the Safe Area?
safe area is the visible and usable portion of the screen on iOS devices.
Here is Apple’s definition
A safe areadefines the area within a view that isn’t covered by a navigation bar, tab bar, toolbar, or other views a window or scene might provide. Safe areas are essential for avoiding a device’s interactive and display features, like the Dynamic Island on iPhone or the camera housing on some Mac models. - Apple
Using SwiftUI or Auto Layout, you can ensure that your interface adapts dynamically to a wide range of traits and contexts, including:
- Different device screen sizes, resolutions, and color spaces
- Different device orientations (portrait/landscape)
- Split view
- External display support, Display Zoom, and multitasking modes on iPad
- Dynamic Type text-size changes
- Locale-based internationalization features like left-to-right/right-to-left layout direction, date/time/number formatting, font variation, and text length
- System feature availability
Platform considerations
iOS, iPadOS safe areas
The safe area defines the area within a view that isn’t covered by a navigation bar, tab bar, toolbar, or other views a view controller might provide.
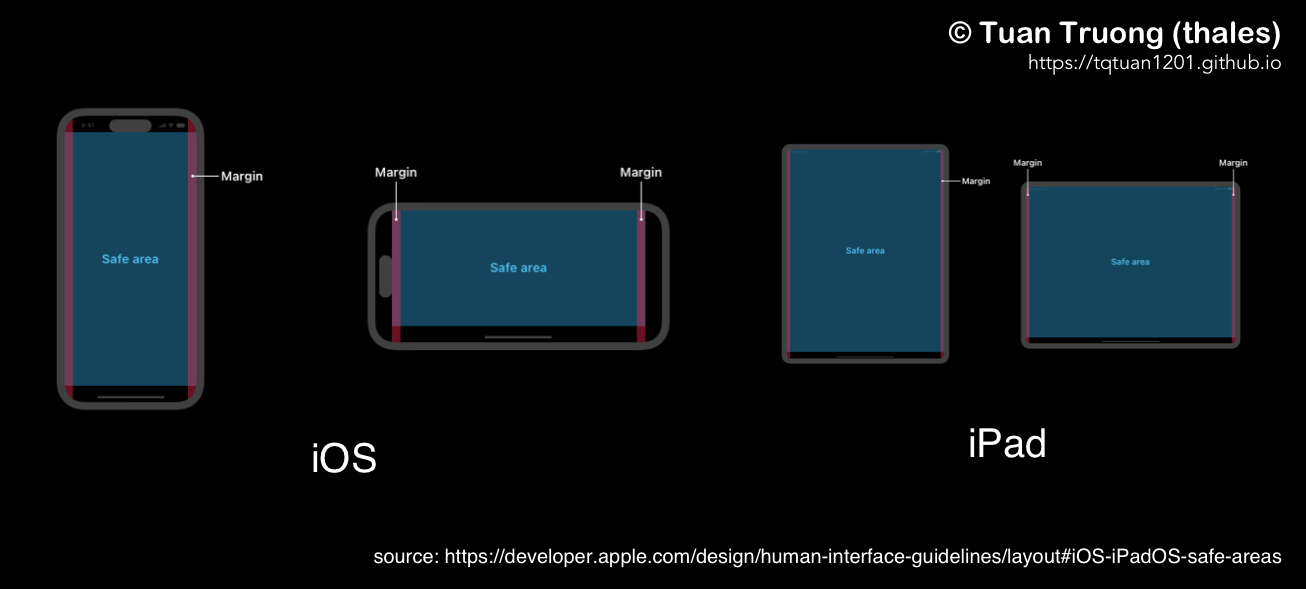
iOS, iPadOS safe areas
iOS keyboard layout guide (iOS 15)
iOS 15 and later provides a keyboard layout guide that represents the space the keyboard currently occupies and accounts for safe area insets. Using this guide can help you make the keyboard feel like an integral part of your app, regardless of the type of keyboard people use or where they position it.
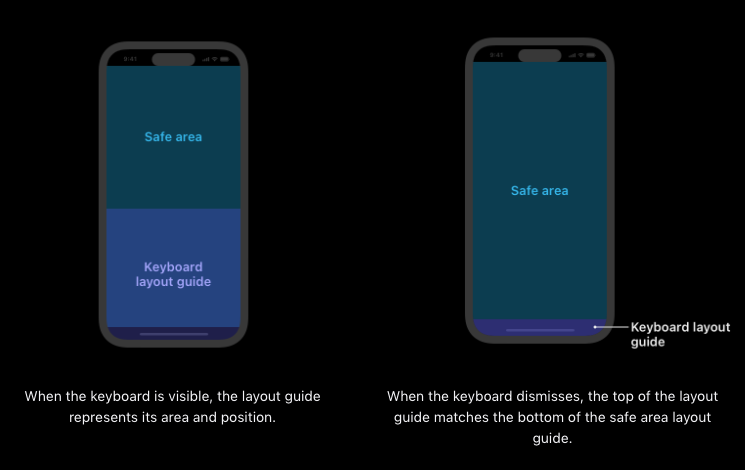
iOS keyboard layout guide (iOS 15)
For more platforms, please visit to layout#iOS-iPadOS-safe-areas
Let’s Code
Let’s work on some examples of safe area in SwiftUI together to understand it better.
Default View
SwiftUI by default positions views only within the safe area, as demonstrated in the following example.
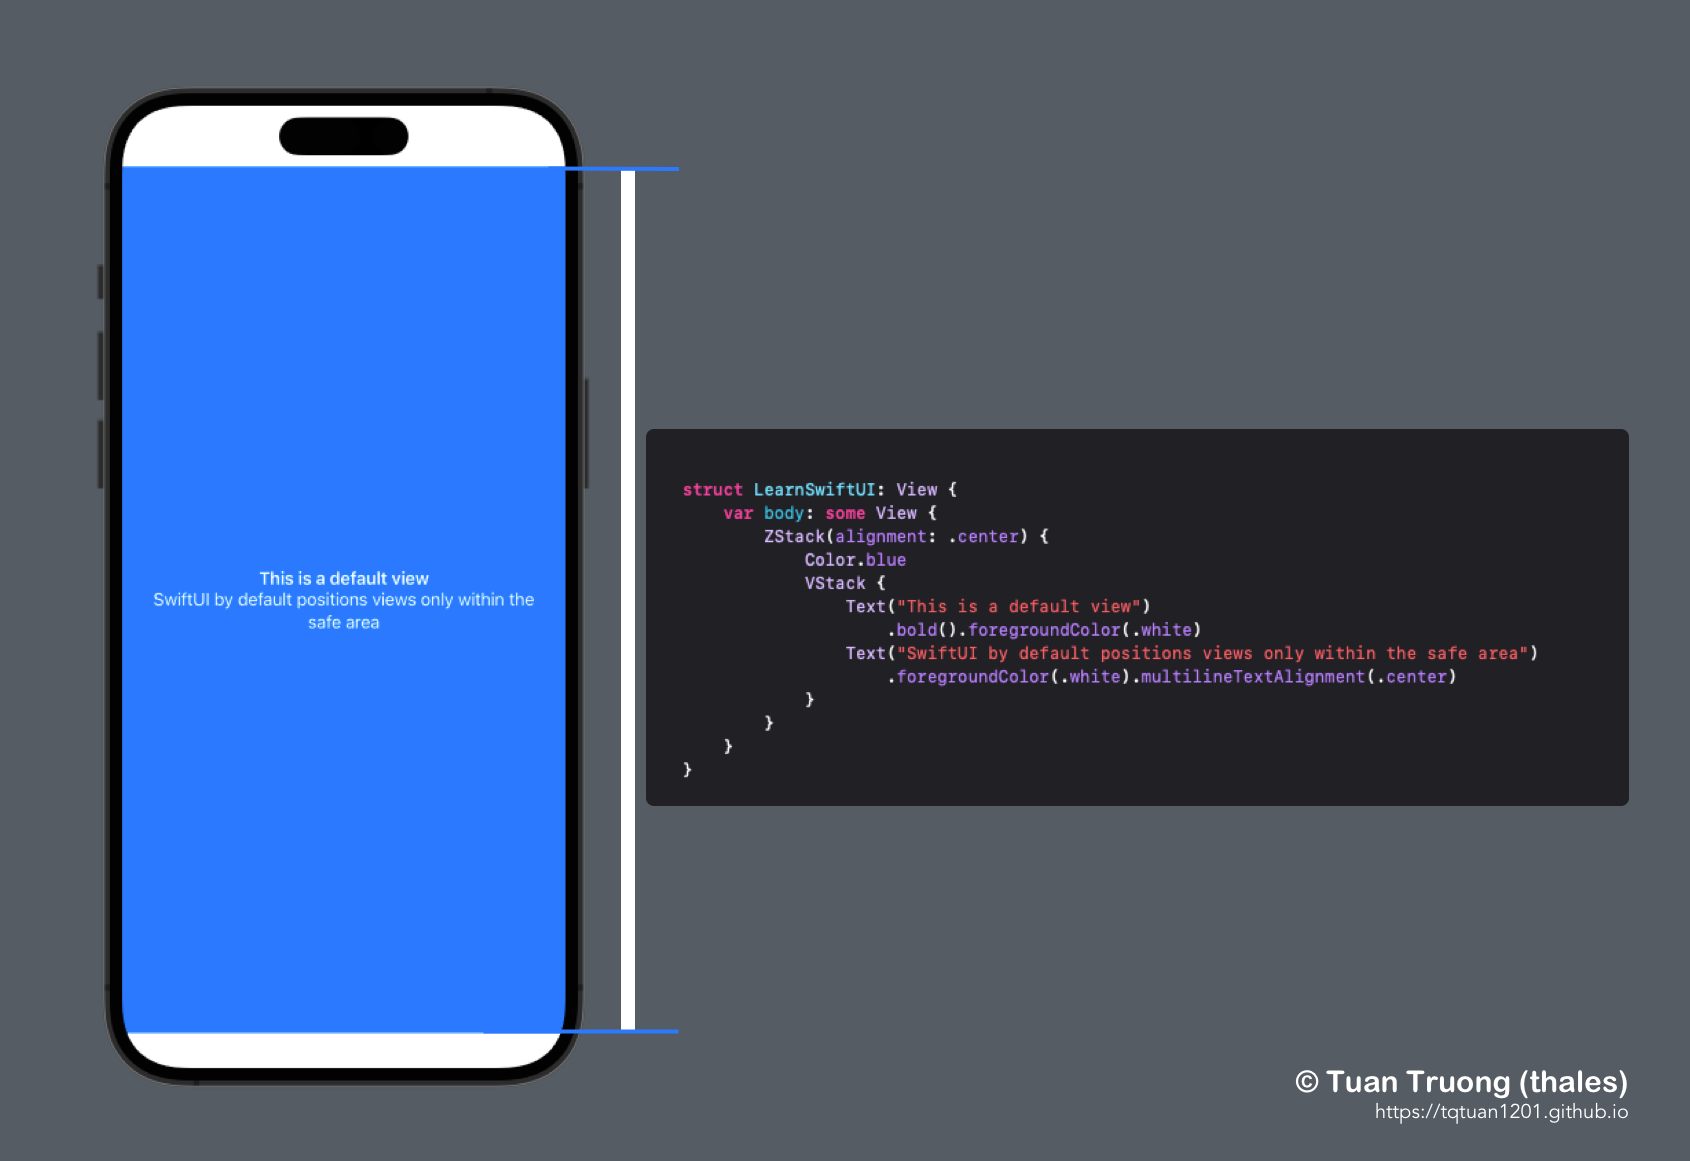
Default View
Ignore Safe Area
We can override the default behavior by applying the ignoresSafeArea
ignoresSafeArea(_:edges:) Expands the view out of its safe area. (iOS 14.0+ iPadOS 14.0+)
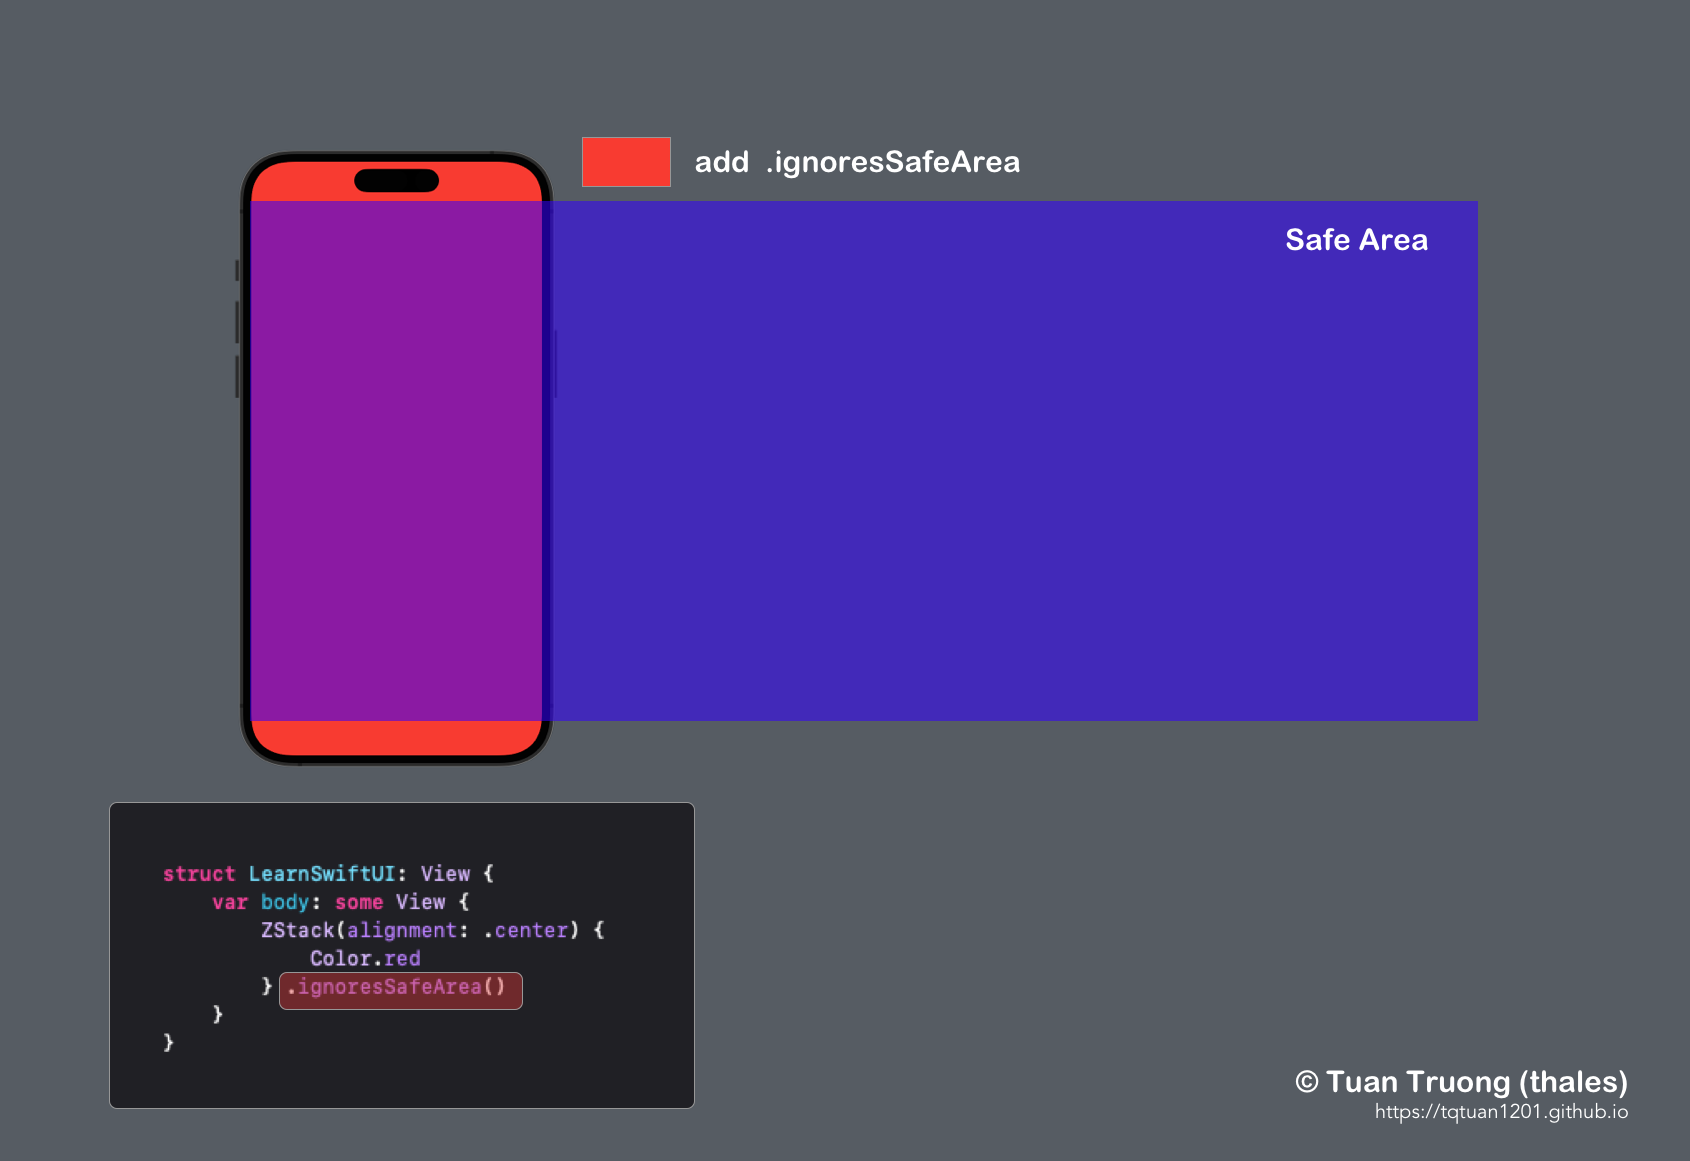
Ignore Safe Area
How can we add a view outside of the safe area in SwiftUI?
@available(iOS 15.0, macOS 12.0, tvOS 15.0, watchOS 8.0, *)
In SwiftUI, we can use the safeAreaInset()modifier to position content outside of the device’s safe area, while also adjusting the layout of other views so that their content remains visible. This modifier effectively reduces the safe area to ensure all content can be seen as intended. It is important to note that safeAreaInset() works differently from ignoresSafeArea(), which only extends a view’s edges to the edges of the screen.
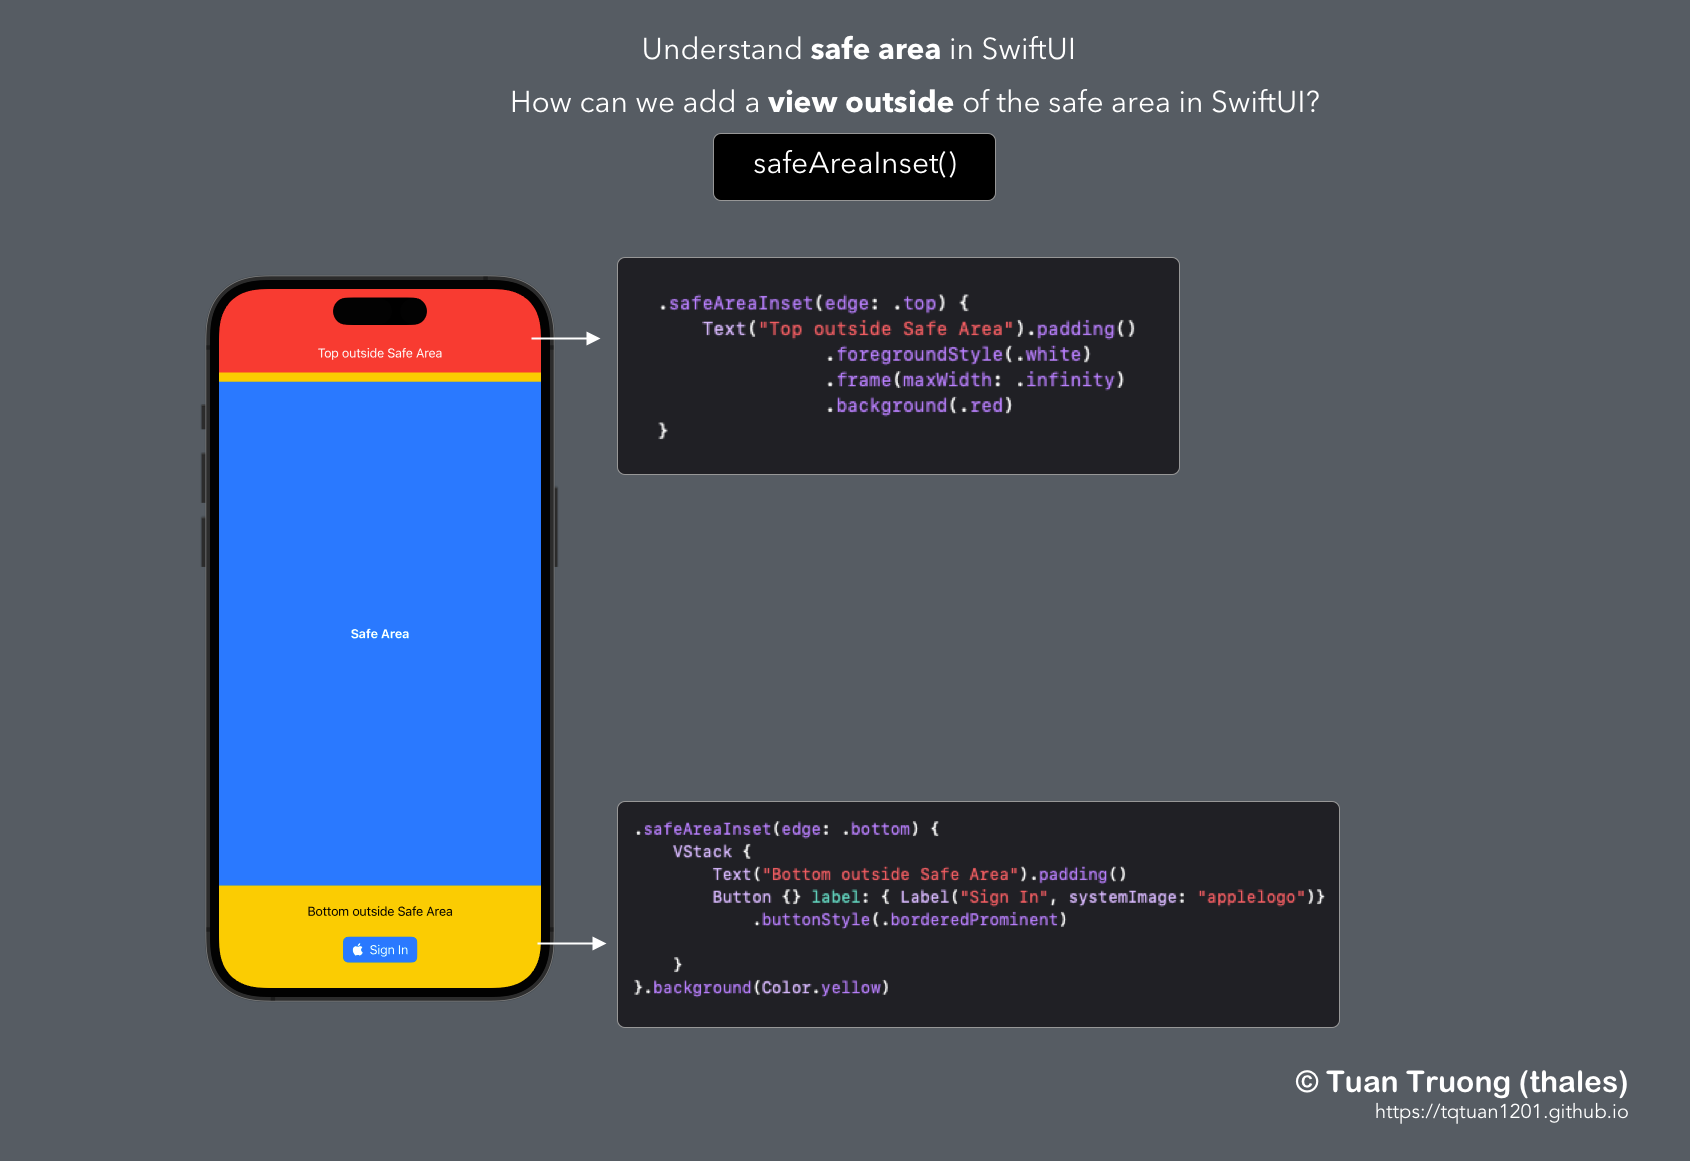
How can we add a view outside of the safe area in SwiftUI?
import SwiftUI

struct LearnSwiftUI: View {
    var body: some View {
        ZStack(alignment: .center) {
            Color.blue
            Text("Safe Area").foregroundColor(.white).fontWeight(.bold)
        }
        .safeAreaInset(edge: .top) {
            Text("Top outside Safe Area").padding()
                       .foregroundStyle(.white)
                       .frame(maxWidth: .infinity)
                       .background(.red)
        }
        .safeAreaInset(edge: .bottom) {
            VStack {
                Text("Bottom outside Safe Area").padding()
                Button {} label: { Label("Sign In", systemImage: "applelogo")}
                    .buttonStyle(.borderedProminent)

            }
        }.background(Color.yellow)
    }
}

struct LearnSwiftUI_Previews: PreviewProvider {
    static var previews: some View {
        LearnSwiftUI()
    }
}
Resources
Layout (Guides and safe areas)- Apple
Conclusion
That’s all. Safe areas are an important concept in SwiftUI that ensure your app’s content is always visible and usable on all devices and screen sizes. In the real world, The default view is fine for most use cases, but it is at times necessary to override it as you learned. In the next article we will go deeper to understand View in SwiftUI. See you soon!
Posts in this Series
- New Feature: Smart New Version Check & UIKit Previews Since Version 2.2.2
- New Feature: UI Debugging in TTBaseUIKit Since Version 2.2.1
- TTBaseUIKit Has Been Integrated With SwiftUI Since Version 2.1.0
- Rebuiding Train Booking Feature by SwiftUI in 12Bay Application - Design
- What Is the Spacer and How Do We Use It in SwiftUI
- 12Bay Integrated SwiftUI. With 12Bay, No StoryBoard, No XIB Files, No Cocoapods, ...
- Understand View in SwiftUI
- Understand Safe Area in SwiftUI
- WWDC23 From the Perspective of an IOS Developer
- SwiftUI Series - Updating TTBaseUIKit to Support SwiftUI
If you enjoy reading my articles and find them helpful, please support me. Your support will encourage me to create and share more content with you ^^
By me a coffee